“Red, orange, yellow, green, blue, indigo, and violet makes a rainbow”.
Colorizing baked goods always gives me a pleasant feeling of being relaxed, carefree and… childlike, for it reminds me of childhood paintings, which are always colorful and bright. Since the success of my colorized mooncake versions, such as making red velvet rose mooncakes last Mid-Autumn Festival, I have been very interested in giving more room for colors to play in my kitchen. Baking is simply more exciting this way, with more “experiments” and new experience, of course!
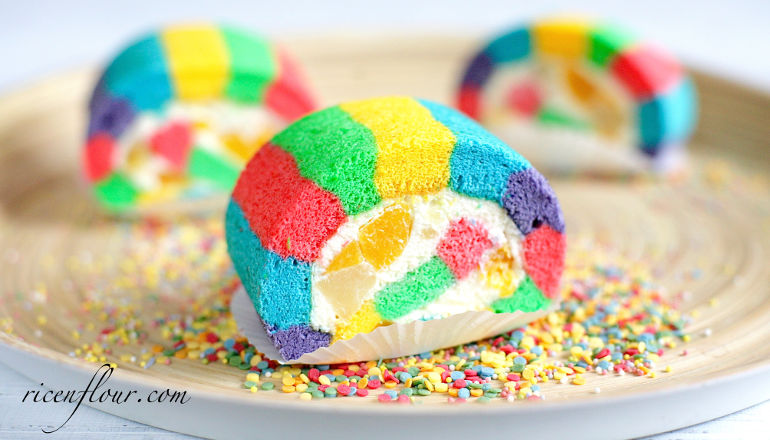
Normally food colorings are used for making decorations such as icing or frosting, for the sake of more eye-catching and appetizing baked goods. Among cakes, the most popular colorized ones to my knowledge are Red Velvet Cakes and Rainbow Cakes with layers of different colors. This time I choose to make a colorized roll cake as a slightly different version of rainbow cakes, for its simple yet yummy taste and beautiful looks.

RAINBOW ROLL CAKE RECIPE
TOOLS: Square pan of 9 x 13 inches (22 x 33 cm) – however, a bit smaller or bigger pan (for example: 20 x 30 cm) can be used instead.
INGREDIENTS
A. For the cake
- 4 egg yolks (18 – 20 gram/ yolk) – at room temperature
- 20 gram (4 tsp) caster/ultrafine sugar
- 40 ml (3 Tbsp minus 1 tsp) milk – at room temperature
- 40 gram (3 Tbsp) vegetable oil (don’t use olive oil)
- 1/2 teaspoon vanilla extract
- 30 gram (1/4 cup) all purpose flour
- 30 gram (1/4 cup) corn starch
- 4 egg whites (30 – 35 gram/ white) – at room temperature
- A pinch of salt
- 3/8 teaspoon (1/2 and 1/4 tsp) cream of tartar – or substituted by lemon juice or white vinegar of equivalent amount
- 60 gram (1 cup plus 1 tsp) caster/ultrafine sugar – sifted
- Food colorings
B. For the Filling
- 125 ml (1/2 cup plus 1 tsp) whipping cream (35 – 40% fat)
- 20 gram (1 tbsp plus 1 tsp) caster/ultrafine sugar – sifted
- Fruits of your choice (It’s better to choose firm and less juicy fruits, I used mangoes, pineapples and canned cherries)
INSTRUCTIONS
This recipe has a video tutorial and has been uploaded on my YouTube Channel (Savoury Days Kitchen). If you can’t play the video on this site, you can watch it directly on YouTube via this link.
Note: the video is in HD setting and has English subtitle, please press CC to activate it.
Printable recipe
Line parchment paper in the pan. You can grease the pan with a small piece of butter before lining parchment paper. This helps the parchment paper to stick to the pan and prevents it from shifting when we pour the cake batter in.
1. Add egg yolks and 20 gram sugar into a bowl, gently beat until the sugar is totally dissolved and incorporated with the yolks.
2. Add milk, vegetable oil, vanilla extract, and mix them well with the yolks and sugar.
3. Sift flour and cornstarch into the yolk mixture, mix them well until we have a smooth and fully incorporated mixture.
4. Whip egg whites with salt, cream of tartar and sugar until they form stiff peaks, i.e. whipped egg whites become smooth and glossy, if you lift the beater, they form a peak that holds and stands.
* Note: It is important that egg whites, bowl and beater are clean and completely free from fat of any kinds (yolk, oil, butter, fat, etc.), otherwise egg whites won’t be successfully whipped.
5. Fold whipped egg whites into the yolk mixture until we have a fluffy, foamy and smooth batter without big air bubbles. The batter shouldn’t be too thin or runny.
* Note:
– If egg whites are beaten so stiff that they form lumps when being folded into the yolk mixture (instead of forming ripples as can be seen in the video), you can gently stir with a wire whisk until they dissolve into the yolk mixture, then continue folding with a spatula. You can also fold egg whites with a wire whisk if you’d like (remember to always use the folding technique rather than stirring).
– If the cake batter looks thin and runny with large air bubbles after folding, it can be explained by under-beaten egg whites or wrong fold technique which bursts the air bubbles in the egg whites. In this case, the cake may not rise properly in the oven and become firm after baking.
6. Divide the cake batter into 5 portions. It’s better to use a scale to achieve even portions, each of which should be about 75 – 85 gram (5 – 6 Tbsp).
7. Add food colorings into the cake batter: Take about 1 tablespoon of cake batter, add it into a separate bowl, then add food coloring into this batter and mix them well. Add the colorized batter back. Gently fold until fully incorporated.
* Note: Thanks to mixing color with a small amount of batter separately in advance, it’s easier and more time-saving to add the colorized part back into the remaining batter with less folding. This helps the cake batter to keep tiny air bubbles and maintain its smoothness and fluffiness.
– Pour the colorized batter into a piping bag. Then repeat with the remaining batter, add different food colorings of your preference.
– Preheat the oven to 170 °C (340 °F) – top and bottom heat.
8. Cut the tip of the piping bag for about 1 – 1.5 cm and pipe the cake batter onto the cake pan, one line for one color. If there is still some batter left, add them onto the batter of the same color already piped in the pan. Make sure to distribute the colorized cake batters evenly.
Tap the pan onto the counter to burst big air bubbles and smooth out the batter’s surface.
9. Bake in the middle of the oven at 165 – 170 °C (330 – 340 °F) in 25 – 30 minutes until the cake’s colors turn deeper. If you lightly press a finger on the cake, it should spring back in shape.
* Baking temperature may change from oven to oven. For small ovens or ovens with unstable heat, you may need to bake at a lower rack and lower temperature (150 – 160 °C / 300 – 320 °F). More details on how to set oven temperature can be seen at this post.
10. Take the cake out of the baking sheet and remove the parchment paper. Lay the cake on a clean towel and place them on a rack. Put the rack on a pan for better cooling. The towel keeps the cake from sticking to the rack, and helps moist air evaporate more easily.
11. Whip whipping cream with sugar until it forms stiff peaks. When the cream looks thicker and forms trails, it is best to continue whipping at low speed to avoid over-whipping the cream, which will make it curdled.
Chop fruits into pieces. Chill whipped cream and fruits in the refrigerator for 30 minutes, since the cream will get firmer, thus easier to be spread on the cake.
12. When the cake is totally cool, cut off the edges, which are usually dry and easily crack when rolling. Put the cake on an aluminum foil with brighter color side turning up.
13. Spread whipped cream on the cake, leaving 0.5 cm (0.2 inch) on the two side edges and 2 cm (0.8 inch) on the bottom edge (as cream will be pushed to the end when rolling). Lay fruits onto the cream.
14. Gently but decisively roll the cake over. Remember to roll the cake over in decisive motions, as my experience shows that the more hesitant we are, the more easily we can break the cake.
15. Wrap the roll with cling film. Chill it in the refrigerator for 3-4 hours. Keep it there for storage and use within 2 days. The cake is best to be served cool.
—————
- Recipe and photos: Linh Trang
- Written by: Xuan Tran
- Edited by: Holly Le


Great video and explanation.
Thank you