Salted eggs are traditionally cured duck eggs that are usually used in fillings of traditional mooncakes, steamed buns, steamed egg custard and many more. Salted eggs can be easily found in many Asian supermarkets that are sold in different packaging styles. In the freezer section, you will even see salted egg yolks (salted egg whites removed) being sold, wrapped in plastic and vacuum packed. I usually buy them when I want to make salted egg yolk steamed buns or meat buns; but they are pretty pricey. So I thought, why don’t I do it myself? It turns out that salted eggs are surprising easy to make. They do require time for the curing process to take place, usually around 4 to 6 weeks, but the preparation is super quick and easy. The traditional salted eggs are made with duck eggs; but it’s hard to find fresh duck eggs where I live; so I substituted them with chicken eggs. They turned out to be very good.
The simplest way to cure the eggs is to use salt and water. The ratio is about 200 – 250 grams salt to 1 litre of water. You can adjust the amount of water depending on how many eggs you want to cure. I usually make a dozen eggs at once and use about 300 ml water. In addition, extra spices and herbs such as cinnamon, star anise, ginger, cardamom, …, will help speed up the curing process. According to Ayurvedic medicine (a system of traditional medicine popular in Asia), these spices are in the ‘yin’ (hot) category and “hot” ingredients can help speed up curing time. I’m not sure this is scientifically proven, but spices also add in extra flavour and aroma, which is definitely a bonus. A spoonful of cooking wine and some sugar can also help the yolks to obtain the bright orange color.
In this post, I will be introducing 3 methods to make salted eggs. The “wet” method which requires water and salt is by far the simplest and has the highest chance of success, therefore it is personally my favourite method. The other 2 methods have just been discovered recently by me: the “dry” method uses only salt for the whole curing process; and the “instant” method needs only 24 hours of curing instead of 4 to 6 weeks as traditional. Both of them have certain pros and cons:
- Even though the “instant” method saves a lot of time, I find that the yolks are pretty salty and do not have such a nice round shape as if made by the traditional method. I would only recommend it if you are using salted eggs in recipes such as steamed buns with salted egg yolks, salted egg yolk prawns, salted egg yolk butter corn, etc., where the salted egg yolks are not kept whole. I would not advise them to be used for mooncake filling.
- When I first heard of the “dry” method, I thought it would be faster than the traditional way as it doesn’t require water, but turned out that the prep stage is even more complicated, as you have to prepare each egg one by one. It’s OK if you are only going to cure 10 – 20 eggs, but imagine preparing 100 of them, it would take the whole tedious day! This method does require a lot of salt than the traditional one, especially if you don’t wrap them in plastic wrap like I did in the video but put them directly into the jar, because you would have to fill the jar with salt until the salt completely covers all the eggs and the gaps between them.
That being said, because I am truly a curious scientist when it comes to cooking and the kitchen, and I would always encourage you to be curious as well, in the video as well as the printable recipes below, I will show you all three methods so that you can easily visualize and compare them. Don’t forget to turn on HD for best video quality.
A. The “Wet” Method
INGREDIENTS
- 20 chicken or duck eggs
- 1.5 litres (6 cups) water
- 375 grams (1 ¼ cup) salt
- 2 star anise
- 1 black cardamom
- 1 small cinnamon stick
- 1 piece of ginger, sliced thinly
- 20 ml (1 ½ tbsp) cooking wine
- 20 grams (1 ½ tbsp) sugar
*Notes:
– If you want to cure more eggs, choose a big jar that can fit all the eggs. Place eggs in the jar and fill with water so that the eggs are totally submerged. Take the eggs out and weigh the amount of water used, that’s how much water you will need. From then on, you can calculate the amount of salt and other ingredients accordingly.
– Spices are optional. You can omit one, two, or all of them. During the curing process, the aroma of spices maybe a little bit too overpowering, but when you try the eggs, it will only give out a very mild flavour which I think is very nice and subtle. If you are to cure more eggs, you can also increase the amount of spices used. Bear in mind though that cardamom has a pretty strong flavour, it’s best to use only 1 or 2.
– The curing time for chicken or duck eggs is about 4 – 6 weeks. If you use quail eggs, the curing time should be much shorter. I have never tried curing quail eggs, but I have heard from other people who have that salted quail eggs are usually ready to be consumed after 15 days.
INSTRUCTIONS
1. Clean and dry the jar that will be used to keep the eggs. Rinse the eggs once with water and leave to dry.
2. Rinse the spices and put them into a big pot along with the water. Add in salt and turn on the heat. Let the water boil vigorously before lowering the heat and let it simmer for another 3 to 5 minutes. Remove the pot from the heat. Now, add in sugar and stir to dissolve. Let cool. After the water has cooled down, add in cooking wine and stir.
3. Place the eggs into the jar and pour in boiled salted water. You will notice some eggs would float to the surface so place something hard, like a small plate, on top of the eggs to make sure that the eggs will always be submerged in the brine. I usually use a clean nylon bag filled with clean water, tie the bag very tightly and then place it on top of the floating eggs.
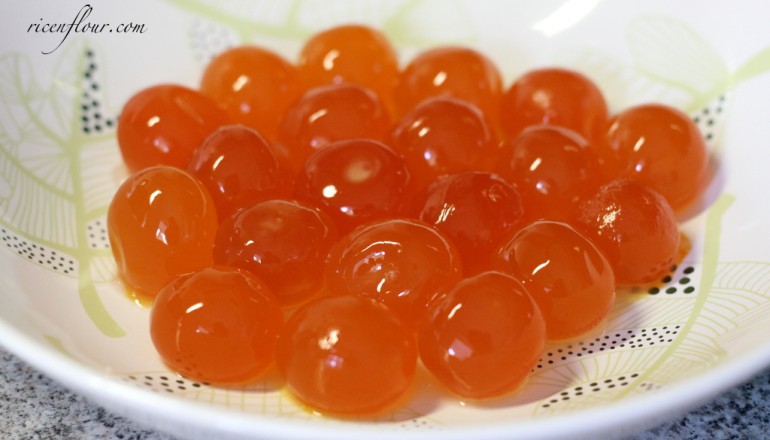
Tightly cover the jar. Normal curing process will take 4 to 6 weeks, so label the start and finish dates on the jar to remind yourself. After 4 weeks, take one egg out and check to see if it’s ready. A good quality salted egg should have a bright orange and firm yolk and a clear egg white (not cloudy or yellow) with no off smell.
4. How to store salted eggs:
- Leave the eggs in the jar, use from 6 to 8 weeks, starting from the first curing date.
- Prepare and cook salted eggs as instructed at the end of this post. This method allows salted eggs to be kept frozen, thus they will have longer shelf life – you just need to defrost the eggs before using.
B. The “Dry” Method
INGREDIENTS
- 10 chicken or duck eggs (if using more, adjust the amount of ingredients below)
- 150 – 200 grams (2/3 cup) salt
- ½ tsp five spice powder
- ½ tsp ginger powder (optional)
- 80 ml (1/3 cup) vodka or cooking wine with high alcohol content
INSTRUCTIONS
1. Rinse the eggs and dry using a dry towel or paper towel. Mix salt with five spice powder and ginger powder. In a bowl, put in vodka or cooking wine.
2. Dip the eggs into the cooking wine, then roll it into the salt and spice mixture so that the salt sticks onto the eggshell. Cover each egg with plastic wrap or place all the eggs into the jar and cover them with salt. Let the eggs sit for 4 to 6 weeks. Check after week 4 as instructed above. Store the salted eggs the same way as instructed in the “wet” method.
C. The “Instant” Method
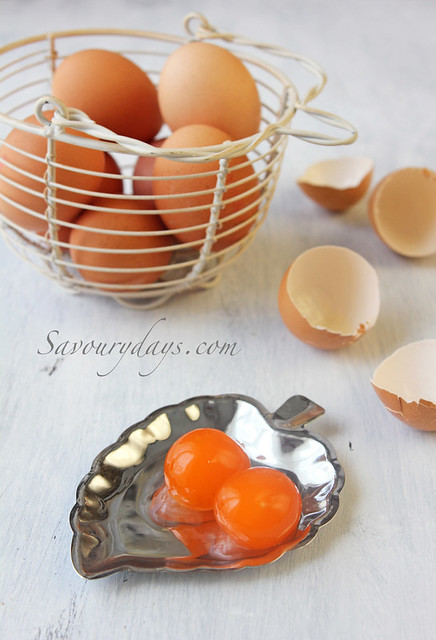
1. Crack the egg in half and remove the white. Keep the yolk inside one of the cracked eggshell.
2. Sprinkle a bit of salt into the other cracked shell that contains no yolk. Gently transfer the yolk into the “salted” shell. Put another layer of salt to cover the yolk. Place the shell in a small bowl or an egg tray to keep the yolk from pouring out. Cover tightly and keep refrigerated for 24 – 36 hours. Wash off the excess salt prior to use. Prepare and cook as normal.
How to Prepare Salted Egg Yolks for Mooncake Fillings
1. Crack the egg and remove the white part. Gently rinse each yolk under water to completely remove all the white.
2. Prepare a bowl of Chinese rose wine (Mei Kuai Lu) or other spirits such as vodka; add in a little bit of five spice powder, cinnamon powder, and ginger powder.
– Prepare a baking tray that has been lined with aluminium foil.
– Dip the salted yolk in the wine for about 30 – 60 seconds. Remove the yolk from the wine and place it onto the tray.
– Repeat for the remaining salted eggs.
3. In a small bowl, mix a little bit of sesame oil with cooking oil and brush a thin layer of oil around the yolks. The oil will help to give the cooked yolk a shinier look and a more fragrant aroma.
4. Pre-heat the oven at 170˚C/ 338 ˚C for 10 – 15 minutes. Bake the eggs on the middle rack at 160 – 170˚C for 5 – 10 minutes. It is important to keep an eye on the baking time so that the yolks will be just done and not too dry.
If you don’t have an oven at home, another option is to steam the yolks. While steaming, place a towel on top of the steamer, or open and clean the lid once in a while to remove all the water droplets formed in the meantime. This helps to prevent water from dripping onto the yolks, which may hinder their shiny look in the end.
5. Let the yolks cool down completely before use. If you are not going to use them right away, place them in an airtight container or plastic bag and keep frozen for up to 2 – 3 months. Thaw in fridge before use.
——————————–——————————–
- Recipe & Photos: Linh Trang
- Written by: San Lương
- Edited by: Thảo Đan


Instead of glass jar can I use plastic jar?
I have never used a plastic jar for this because I’m afraid the salty liquid will have some harmful effects on the plastic.
Old chinese method of salting duck eggs is mixing rice hisk ash or wood ash with salt and water. Then you bury the eggs in the mixture. One way of checking if the mixture is salty is thru bouyancy. Egg will float if its salty enough.
You can do the instant method with 1/2 1/2 salt and sugar plus aromatics. If you only do it for 2 hours then rinse you get a sort of soft boiled consistency…. fantastic on butter toast
that’s a great tip, I’ll try it soon, thank you very much for sharing!
I’ve always wanted to make steamed egg buns. Can I only use ginger and cinnamon in the first method and replace the vodka with a different alcohol? Thank you so much. I cant wait to make this.
Yes you can, as long as you have enough salt, the eggs should be fine.
you added wine in salted egg…can i omit this?
This this brine be re-used for another batch?
No, it’s better to make a new brine.
Such an interesting post, I would really like to try this. The result looks almost like big caviar.