As a little kid, I was genuinely fascinated by the fairy tale of the Hansel and Gretel brothers. The most impressive part of the story was when the brothers got lost wandering in the woods, and came across a cottage with the walls built of gingerbread, the roof of cakes and windowpanes of crystal sugar. I would always stop there and daydream of one day running into a house like that, a fairy tale house constructed entirely of cake and confectionery, from the walls, the roof, to the doors and even the furniture. That dream house, if ever became reality, must be utterly beautiful, sweet-smelling, and delicious as well.
Now that I’ve grown up, a pleasant discovery has come to me that this house isn’t merely a fairy tale legend – it does, in fact, exist in real life. Every year, as Christmas hits the town, this house “appears” through the adept fingers of the wives, the mothers, and the daughters everywhere, bearing the delightful name “the Gingerbread House”. This name is justified by gingerbread serving as the main material for the walls, which are then attached together using icing sugar, a sticky, pasty sugar mixture that hardens in the air just like cement. Decorations for the house are also made of various confectionaries and other edible goods. A house that comes to life from the fairy tale.
Having always fantasized about that sweet house for my entire childhood, I could hardly hold my excitement when I started building a fairy tale house of my own four years ago.There hadn’t been any projects that were carried out with as much attentiveness and passion as my first Gingerbread House. The entirety of my concentration and meticulousness seemed to have been poured from my body, through my fingers into the very smallest details, even the tiniest ornamental dots on the door.
My 2011 Gingerbread House

Was it exhausting? A little indeed, but it was minimal compared to joy. The joy of seeing the gingerbread walls coming out solid, perfectly shaped and flawlessly golden brown from the oven. The joy of producing the beautifully white icing sugar with perfect consistency. The joy of witnessing the walls firmly constructed one by one, and the house gradually emerging into its anticipated shape. The joy of carefully sprinkling every little candy and suddenly a colorful flowerbed took form under the windowpanes; then adhering every single “wood stick” made of cookies together to build the fences and front porch. The joy of gently shaking the sieve and watching sugar falling onto the roof, the walls and the ground just like winter’s snow. Other instances of joy were uncountable. The only regret was having no one else to join me. If only there had been my cousins, nephews, nieces and other kids in my family to help build the house, the experience would have been a lot more blissful.
It turned out that the seemingly complicated Gingerbread House is actually not difficult to make at all, and not too time consuming either. It takes one day out of your weekend at most, even less if you are an experienced baker with talented hands. So I think this is indeed an enjoyable challenge worth putting in our must-do list every Christmas season. Especially if there are little kids in your family – let these enthusiastic “construction workers” lend you a hand and create a delightful memory by building this wonderful house together!
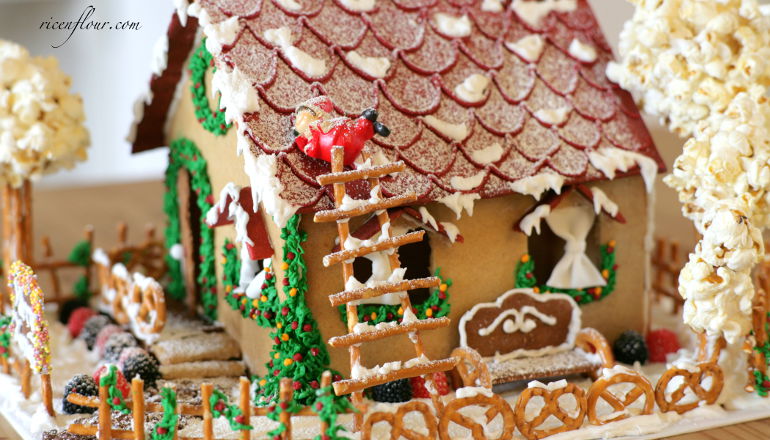
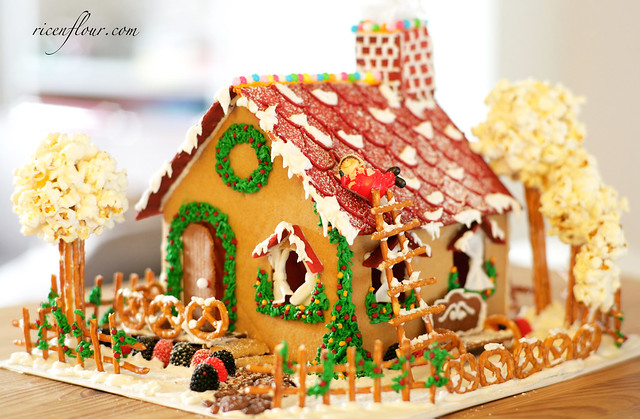
My 2015 Gingerbread house
 GINGERBREAD HOUSE RECIPE
INGREDIENTS
- A. Gingerbread cookie dough (for walls, roof, etc…)
- 420 gram (3.5 cup) all-purpose flour
- 5 gram (2 tsp) ginger powder
- 3 gram (1 tsp) cinnamon powder
- 3 gram (1/2 tsp) kosher salt
- 100 gram (4/5 cup) powder sugar
- 160 gram (3/4 cup minus 1 tbsp) unsalted butter
- 145 gram (7 tbsp) honey
- 2 egg yolks (18 – 20 gram/yolk)
- 1/8 tsp cocoa powder
- Red food coloring
B. Royal Icing Sugar
- 1 egg white (35 gram)
- 160 – 180 gram (1.5 cup) powder sugar
- 1/8 tsp cream of tartar (can substitute with lime juice or vinegar in same amount)
- ¼ tsp vanilla extract
- Food coloring (I used Wilton icing color)
METHOD
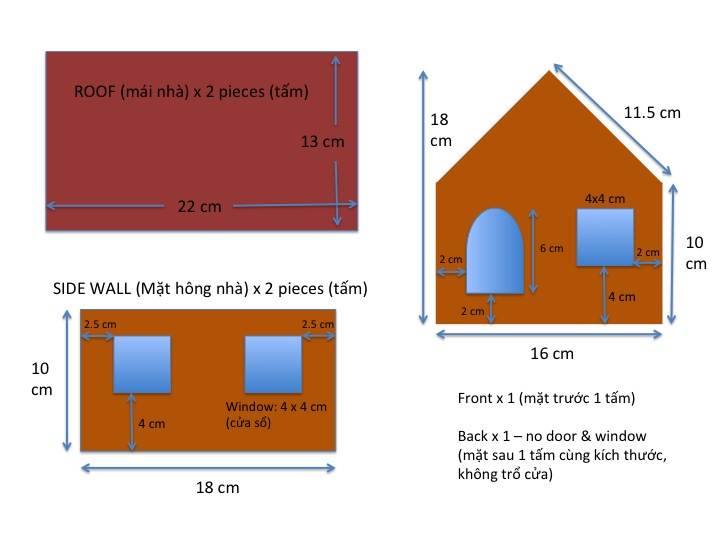
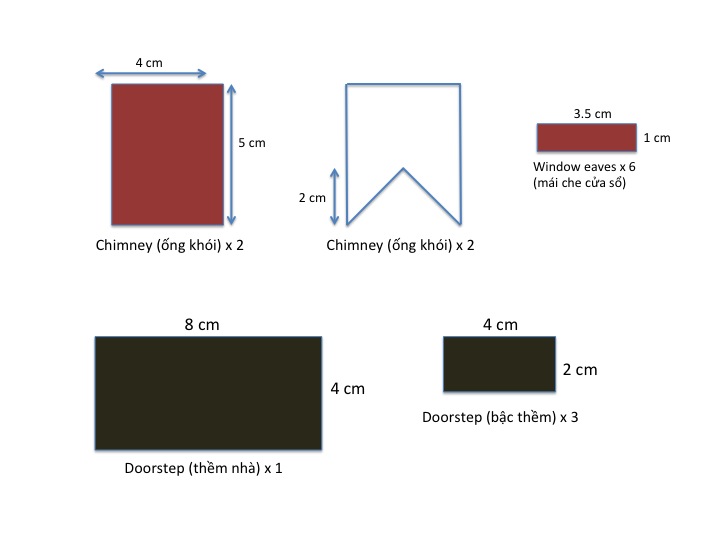
* The templates for the house are as below. On a piece of cardboard, use the exact measurements as described to make the templates so that it will be easier for you to cut out the dough later on. The amount of ingredients above is enough for the following templates.
* House decorating idea: I have quite a collection on my Pinterest. You can take a look at them in my Gingerbread house ideas and inspirations board.
* How to make a gingerbread house, from dough preparation, rolling and cutting to the construction of the house are described in the video posted on my Youtube Channel (Savoury Days Kitchen). If you cannot view the video on this website, please view it direct on Youtube.
The subtitle is available in both Vietnamese and English. You can turn on CC and choose your preferred language in Setting. Also, choose 720p (HD) setting for the best video quality.
* Printable recipe:
A. Prepare the Gingerbread Dough
1. Melt the butter and let it cool to room temperature until it turns somewhat thickened. Meanwhile, in a bowl, mix in flour, ginger powder, cinnamon powder, and salt. Whisk well and leave aside.
2. When the butter is thickened, divide sugar into 3 – 4 parts and sift them into the bowl, mix well until sugar is totally dissolved before sifting in more.
3. Put in honey and mix well. Then, add in egg yolks and vanilla extract, and combine until we have a smooth batter.
4. Take out about 1/3 of this batter (about 140 gram) and leave it aside. Similarly, take out 1/3 of the flour mixture in step (1).
Put in some drops of red food coloring into this 140-gram-batter and blend well. Also, sift cocoa powder into the flour mixture and mix well. Then, combine the red batter with the flour mixture. Knead gently until it becomes dough. This red dough will be used to construct the roof. Wrap it tightly with plastic wrap and leave it in the fridge for 30 min until the dough becomes hard and less sticky but still remains soft enough to work with.
5. Similarly, mix the rest of the batter with the rest of flour mixture until it becomes dough. Wrap it tightly with plastic wrap and let chill in the fridge.
* Note:
– Depending on the water absorption capability of the flour, your dough may appear to be either drier or runnier than it is seen in the video. If the dough is too dry, add in some oil. If too runny, add in some more flour and let chill in the fridge until the dough hardens.
– Chilling time will vary depending on the temperature and climate condition at where you live. If you are living in a cold climate area and the dough is not too sticky, chilling time can be short. On the other hand, if your area is hot and humid, the butter may melt fast, and thus the dough will require longer chilling time.
6. When dough is hard enough, prepare 2 pieces of wax paper. Put the dough in the middle of these 2 sheets and roll them to 0.5 – 0.7 cm thickness. This helps to prevent dough from sticking into the rolling pin as well as to make dough smooth. While rolling, if the dough is too soft and sticky, put it back into the fridge for some minutes until it’s firm again, then continue rolling.
7. Place the house templates on the dough. Use a small sharp knife to cut out the pattern pieces from the dough. When finished, remove the wax papers and unused dough. Put these pieces of dough back into the fridge for another 30 minutes until the dough is completely firm and dry. The purpose of using wax papers is to make it easier for the transfer process and to prevent the pieces from being misshaped.
8. Repeat with the rest of the templates until you have all the pieces of the house. Left-over dough can be used to make smaller pieces such as door, windows, doorsteps, garden lounge…
9. Preheat oven at 190˚C/ 375˚F (top and bottom). Bake the dough pieces in 7 – 8 mins then rotate the tray around so that they get even browning. Bake for another 8 -10 mins at 170˚C until the rim turns golden brown.
* Note: It is important to bake the bigger pieces in one batch and the smaller pieces in another batch as the baking time will be different for different sizes. Baking temperature of smaller pieces remains the same but baking time will be shorter, about 10 – 14 mins depending on the sizes.
10. Take the cookie pieces out from the oven. Immediately place the patterns on them and cut to re-shape them as needed. Leave them on the tray for 10 – 15 mins to let them harden a little before transferring them to the cooling rack or else they may crack.
* Note:
– If you live in a humid area, after baking, turn the oven on at 100˚C/ 212˚F and dry the pieces for 5 – 10 min so that after cooling, they are firm and crispy enough for the house to stay long. If the pieces are too soft and moist, the house may fall apart.
– If, after the construction of the house, the gingerbread pieces appear to turn soft, you can turn the oven light on and leave the house in the oven for several hours. Alternatively, you can use a blow dryer or place a small light bulb inside the house.
B. Make the Royal Icing Sugar
* This recipe is for 1 egg white. You may need more depending on your usage. I used quite a lot to decorate the house and to make snow and thus needed 4 times more of the recipe.
1. Boil some water in a small pan. Once it boils, lower the heat. Put on top a bowl of egg white so that the bottom of the bowl doesn’t touch the boiling water. Stir continuously so that the egg doesn’t get cooked. When egg white reaches 60 – 70˚C (140 – 160˚F), remove the bowl from heat and beat for another 30 sec. This process helps to sterilize the egg and to make the egg white cream better.
2. Add in cream of tartar, beat at low speed until the egg white forms small bubbles like soap. Then add in sugar.
3. Slowly add in sugar, little by little, beat until completely dissolved. Stop once in a while to scrape the sides and bottom of the bowl.
4. The more sugar being added, the shinier the mixture will become. You may need more or less sugar; but in a nutshell, you need to have enough sugar so that the royal icing is dense and when lifting the whisk, hard peak forms like what is seen in the video.
* Note:
– If you over-add the sugar and the royal icing becomes too dense, add in a little water and mix well till the mixture thins out to the desired consistency.
– If you want to have extra flavor, you can add in a drop or 2 of vanilla extract into the sugar. You can also use food coloring to make royal icing with different colors.
– Royal icing sugar needs to always be stored in tight bag or container because if left outside, it will dry up very quickly. In addition, if left for one day, the icing may be a little runny. In this case, you may need to mix it again before use. I store royal icing sugar in a tight container and at room temperature (18 – 20˚C/ 65 – 68˚F).
– When use, it is recommended to prepare a tumbler cup or a bowl to put your icing bags in. Put a very slightly damp paper towel in the bottom to prevent the tips from drying out and clogging up.
C. Assembling and decorating the house
 1. Make sure you have a spacious, flat and stable work surface to build your gingerbread house upon. Avoid slippery surfaces, such as aluminum foil or plastic foam, which could be difficult to work with.
2. When assembling the house, or doing anything involving royal icing sugar (such as making trees as in the video), you must give it time to harden and dry completely before proceeding with the other steps. If the weather is hot and humid, the icing will take longer to harden (in this case, you could use a fan to hasten the drying process).
3. You can construct a house of your own style and structure, but if you are not very experienced with gingerbread houses, you shouldn’t make the house too tall, or the roof too steep. It would be more likely to collapse.
4. The decoration is entirely up to your preference, but if you’d like to pipe embellishments on the walls with icing sugar, make sure you do it before assembling the pieces. It’s much easier than piping on the pieces that have already been put together.
5. During the construction process, if you accidentally break a piece, don’t freak out. Just use icing sugar as glue to put the broken pieces back together, then proceed 
6. How long can these houses last? If you’re making them for consumption, then eat them up within one week. The egg white in the icing sugar has already been pasteurized (by heating it up to 60 – 70°C), but it shouldn’t stay for more than 3 days (if you’re keeping them for longer, then discard the icing sugar before you eat it). If your houses are made purely for display and preserved well (in dry, cool places at about 20°C), then their shelf life is exceedingly long lasting. My old house lasted for almost half a year, if I’m not mistaken.
I hope you will have tons of fun building these amazing gingerbread houses.
 ————-
————-
Authors: Trang – San – Holly


JOIN US