I first tried Singaporean snow-skin mooncakes a few years ago when I happened to travel to Singapore during Mid-Autumn Festival. The ingredients of a Singaporean snow-skin mooncake are relatively similar to those of Vietnamese one: the crust is made of glutinous rice and traditionally white (hence the ‘snow’ in ‘snow-skin’), the filling is usually made sweet. However, Singaporean snow-skin mooncakes must be kept cold and its skin is quite chewy but soft and tender at the same time.
I don’t know if this is just me, but I somehow find that cold desserts usually feel less heavy on the stomach at the end of a meal than warm desserts – maybe because the coldness makes me feel more refreshing? That is why I decided to try out making Singaporean snow-skin mooncakes as an alternative for traditional Vietnamese mooncakes after eating way too many of the latter. The filling in this recipe is similar to my traditional Vietnamese snow-skin mooncakes recipe, however, do check out my suggestion on other types of fillings.
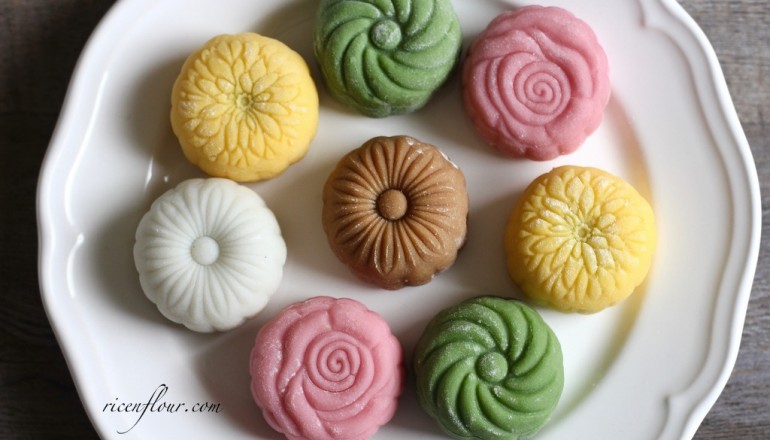
Singaporean Cold Snow-Skin Mooncakes recipe

INGREDIENTS
A. Matcha Mung Bean Filling
- 100 grams (3.5 oz) mung bean – skinned
- 45 – 50 grams (3 tbsp) caster sugar
- 45 grams (3 tbsp) coconut oil or peanut oil
- 1 tsp matcha paste or 1 – 2 tsp matcha powder
B. Mooncake Skin
- 100 grams (1 cup minus 2 tbsp) cooked glutinous rice flour
- 80 grams (3/4 cup) icing sugar
- 30 grams (2 tbsp) shortening
- 80 – 150 ml (1/3 – ½ cup) milk or water – cold
- Food colouring, flavour extracts… as desired
* Ingredients and Tools Explained:
– For explanations on cooked glutinous rice flour, check out this recipe.
– Different glutinous rice flour has different water absorption level; thus the amount of water can vary. This is why the recipe does not call for a fixed amount of liquid. Keep an eye on the consistency of the dough and adjust the amount of liquid added.
– You can reduce the amount of oil and sugar in the filling. If your filling turns out to be greasy, it is because of incorrect cooking method. Try to follow the instructions closely and cook the filling slowly at a low temperature to let the sugar and oil fully incorporated, the filling will be very smooth, soft and not greasy at all.
– Icing sugar is finely ground sugar with an addition of corn starch – a thickening agent (that’s why cake frosting recipes call for icing sugar), and therefore cannot be substituted with caster or granulated sugar.
– Shortening determines the softness of the cakes. If you don’t have shortening on hand, you can try my traditional Vietnamese snowskin mooncake recipe.
– You can substitute milk or water with fruit juice such as carrot juice, beetroot juice, etc. to add natural colour and flavour. Note that the juice needs to be boiled for safe consumption and let cooled completely before use. DO NOT boil pandan juice as it will change colour at high temperature.
– The mooncake moulds I used in the video is from Singapore. I don’t know if there are any online baking suppliers that offer these kinds of moulds. However, this recipe works well with any other kinds of mooncake moulds, so don’t worry if you can’t find a similar mould as mine. (Many mooncake moulds are available on Ebay or Amazon, to search, use the keyword: “mooncake moulds”).
INSTRUCTIONS
A detailed recipe with all the specific notes is available on Savoury Days’ YouTube Channel (subscribe to get all the newly uploaded recipes) in both English and Vietnamese. Check it out at this link or the video right below. Don’t forget to turn on HD setting for best quality.
PRINTABLE RECIPE
A. The Filling
You can definitely use store-bought fillings such as red bean/ lotus/ mung bean/ sesame seed paste…. However, I prefer to make my own filling as I really like the fresh taste of homemade filling. Plus, I can also control the sweetness of my fillings (I always find store-bought mooncake fillings overly sweet).
1. Rinse the mung beans, then soak them in hot water for about 2 hours until the beans have softened. Transfer the beans to a saucepan and bring to a boil, discard any foams. Then lower the heat and simmer until the beans are very soft. Add in more water if it evaporates too quickly. Stir every now and then to prevent the beans from sticking to the bottom of the pan.
2. In another pot, dissolve 50 grams sugar in 60 – 70 ml water and then bring to a boil. Lower the heat, simmer for another 2 – 3 minutes until the water reduces by a third or a half. Let cool. This is our sugar syrup.
3. Blend or mash the beans until we have a very smooth runny paste. Add some more water into the blender to make blending easier if necessary.
4. Pass the mung beans through a fine sieve into a non-stick pan. Add in sugar syrup and coconut or peanut oil. Stir to mix well. At medium heat, cook and stir continuously. The water will start to evaporate once the mixture starts boiling, which helps to thicken up the filling.
5. When the filling has been cooked for 20 – 25 minutes and has considerably thickened, add in matcha paste or matcha powder that has been dissolved in hot water. Continue stirring until the filling becomes very thick, and then reduce the heat to the lowest setting. Continue stirring until you get a very smooth, soft, thick paste. Let cool.
You should be able to get 280 – 300 grams filling. This type of filling still contains quite a lot of water in its content; thus it is only suitable for this type of snowskin mooncakes, which are kept in the fridge. If you use it for baked mooncakes, the mooncakes will get mouldy quickly.
6. When the filling is still warm, divide it into 20-gram balls. Cover or wrap them tightly with plastic wrap.
B. The Mooncake Skin
1. Sift flour and sugar, mix to blend.
2. Add in shortening. Quickly mix by hand until the mixture resembles bread crumbs.
3. Make a well in the middle of the flour mixture, pour the cold liquid (milk, water or juice) into the well. Using a spoon, mix until incorporated. Then, wearing gloves, knead the dough until it becomes soft and smooth. Cover the dough tightly and let rest for 10 – 15 minutes.
* Notes:
- Start with 100 – 120ml water/milk. Add more flour if the dough gets too wet, or more liquid if the dough is too dry. Filling that is a little wet and soft is better than filling that is too dry.
- It is recommended to use gloves while handling the dough as it is quite sticky.
4. Divide the dough into 30-gram portions. Dust the working surface and your hands with some cooked glutinous rice flour.
I am using 50-gram moulds in this recipe. If you are using a different mould size, adjust the amount of dough and filling for each mooncake accordingly. The filling : skin ratio can be 2 : 3 or 1 : 1.
5. Flatten the dough ball into flat round shape, the edges should be a bit thinner than the centre. Put the filing in the middle of the flattened dough and wrap tightly. Roll the cake ball over some dusted flour then press it into the mould. Then remove the cake from the mould, we will have a mooncake with pretty patterns on its surface.
6. Continue with the remaining dough and filling. After shaping, store the cakes in an airtight container and refrigerate for about 2 hours for the cakes to chill and the fillings to become firmer and chewier.
These mooncakes taste best during the day. They can be stored in airtight containers in the fridge for up to 3 days. If you’d like to keep them longer, you can freeze them and thaw in the fridge before use.
——————————–——————————–
- Recipe & Photos: Linh Trang
- Written by: San Lương
- Edited by: Thảo Đan


JOIN US