Ogura Cake! I remember this cake was once such a hit amongst Asian bloggers in Singapore, Hong Kong, Malaysia… People were literally crazy about it, as it resembles very much the famous soft and airy Japanese Cotton Cheesecake (JCC) but without using many fat ingredients. In JCC, there are cream cheese, butter, whipping cream…; but Ogura cake only requires oil and egg yolks as ingredients for fat. Sounds like good news for our waist, doesn’t it?
Ogura cake has its root in Malaysia. It is inspired by, of course, the JCC, which may explain why it has the name of “Ogura”, which, translated from Japanese, means “lovesick”. To me, Ogura cake is like a cross-bred between JCC and the traditional chiffon: it has the softness of a Japanese cheesecake, but is also airy as a chiffon. As soft and airy as it is, but because of too little fat used, it loses parts of the flavour and richness that fat provides; you know, the satisfaction and “mmmm” sensation you have when you bite into a JCC. But nonetheless, Ogura cake remains the popular low-fat alternative to JCC, and is used very widely as cake base in a lot of Asian layered cakes or mousse cakes.
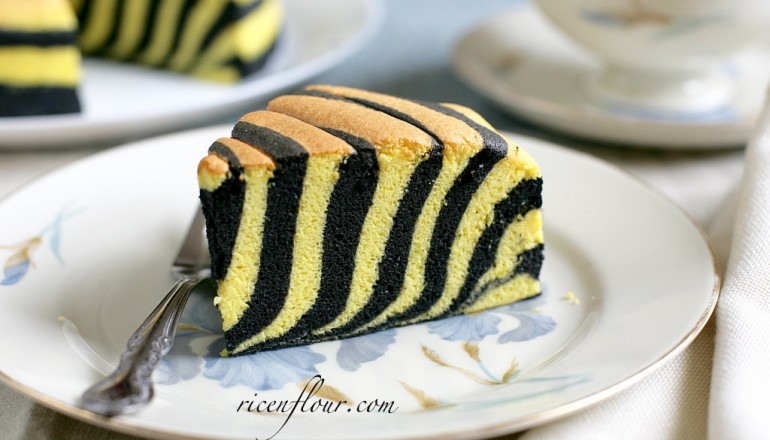
In this recipe, not only will I introduce the Ogura cake, but I will also make a twist to the traditional Ogura recipe by incorporating activated bamboo charcoal powder to transform it into a zebra cake. I’m not sure if it’s only me, but when using this powder in a cake, I feel like the cake is even softer and airier. I know that using bamboo charcoal in food may sound insane to some of you guys. But activated charcoal powder has been demonstrated to have many benefits for health, such as to detoxify the body or help with insomnia… Don’t be offset by the word “charcoal”, the powder itself has almost no actual flavour, it just gives the food the amazingly sexy black color. Sometimes stepping outside of your comfort zone and try something new, strange, different, can be an exciting experience, and who knows, you may become famous one day for inventing something totally new and delicious  . Now, let’s get going!

ZEBRA OGURA CAKE RECIPE
TOOLS: One round pan of 20 cm (8 in”) in diameter and 10 cm deep, or one 18 x 18 cm square pan, parchment paper.
INGREDIENTS:
- 4 gram (2 tsp) bamboo charcoal powder
- 15 ml (1 tbsp) hot water
- 5 egg yolks (medium-sized, 18 – 20 gram/yolk)
- 1 egg (medium-sized, 50 gram excluding shell)
- 60 gram (4.5 tbsp) cooking oil
- 80 ml (1/3 cup) milk
- 75 gram (1/2 cup + 4 tsp) all-purpose flour
- Few drops of yellow food coloring (optional)
- 5 egg whites (medium-sized, 30 – 33 gram/white)
- Dash of salt
- ¼ tsp cream of tartar (optional)
- 75 gram (1/3 cup) caster sugar
*Notes:
– My bamboo charcoal powder is from Japan. You can easily find many different brands of activated charcoal bamboo powder on Amazon, just make sure to buy the edible one. If you prefer to not use bamboo charcoal powder, an option is to use 10 gram cocoa powder diluted with 30 ml hot water (in place of 4 gram bamboo charcoal powder and 15 ml hot water).
– It is important to use eggs with the right size, otherwise too much or too little egg used will have a big impact on the final cake.
INSTRUCTIONS:
A detailed recipe with all the specific notes is available on Savoury Days’ YouTube Channel (subscribe to get all the newly uploaded recipes) in both English and Vietnamese (select your preferred language by clicking CC > Setting > Language). You guys can check it out at this link or the video right below.
PRINTABLE RECIPES
Preheat the oven at 150˚C (302˚F), top and bottom heat. Line parchment paper at the bottom of the pan and do not grease the side.
1. Mix bamboo charcoal powder with hot water and set aside.
2. In a bowl, put in 5 egg yolks and 1 egg. Beat until the mixture becomes very thick, smooth and pale, almost ribbon stage. This step is very important as it contributes to the height and softness of the cake.
3. Slowly add oil into the egg mixture, mix well on lowest speed (or just whisk it by hand with a wire- whisk). Then, slowly add in milk and mix well.
4. Divide the flour into 2 parts, sift each part into the bowl, mix well before adding more. If you use a mixer, set it at the lowest speed and stop right when everything is incorporated; do not mix too much. After all the flour has been added, using a spatula to scrape down the bottom and sides of the bowl. This mixture should be quite runny.
Clean the beaters very well before using them to beat egg whites.
5. Beat egg whites with salt, cream of tartar (optional) and sugar until it forms almost stiff peaks: peaks form but the tip is a little droopy (firm peaks will stand straight with sharp peak tips that won’t droop).
This is a very important step. If the meringue is not stiff enough, the cake will not rise well and the inside will be too moist (feel wet). If the meringue is too stiff, the cake surface may crack during baking and/or deflate after taking out from the oven.
In order to have a good meringue, it is best to use eggs that are at room temperature. Bowl, beaters, and egg whites need to be very clean and not contaminate with fat residues such as oil, butter, egg yolks…
6. Go back to the flour-yolk mixture, whisk to blend with a balloon whisk for about 10 seconds until the mixture is well-incorporated.
7. Add in 1/3 of the meringue into the flour-yolk mixture, mix well using a balloon whisk. The purpose is to “lighten” the yolk mixture to make it easy to fold in the remaining egg whites. Then, add in another 1/3 of the meringue, this time, use the fold method to incorporate the meringue into the yolk mixture. Fold gently so that the air bubbles inside the whipped egg whites won’t break.
If, after mixing, your batter is still runny and appears to have a lot of large bubbles, it is possible that the meringue is not whipped enough or the folding method is incorrect (End result: cake will be crumbly and not rise well).
If, after mixing, your batter has a lot of little clumps of egg whites, it means the meringue has been over-whipped. In this case, use the balloon whisk to fold the batter gently (using the correct folding method). However, it is pretty good chance that the cake will have cracked top or deflate after removing from the oven.
8. Divide the batter into 2 parts. Add bamboo charcoal mixture in one part as followed: add 3 tablespoon of batter into the bamboo charcoal mixture, stir well then pour it back to the original batter, fold gently with a spatula. This method is better as compared to adding bamboo charcoal water directly into the cake batter because it helps preventing the air bubbles in the batter from breaking; otherwise you will risk having the charcoal portion of the cake deflate.
9. Using the same method as above, add yellow coloring into the second batter (this is optional because I like a little bit of contrasting colors in the cake).
Boil some water to prepare for the double-boiling (water bath) step.
10. Pour 3 tablespoon of bamboo charcoal batter into the middle of the pan; then, pour 3 tablespoon of yellow batter into the middle of the bamboo charcoal batter. Repeat this step with the rest of the two batter; shake or swirl the pan occasionally for the batter to spread evenly. When done, we will have a uniform batter with rings of black and yellow on top of each other, the top one smaller than the bottom.
The thickness of the rings depends on how much batter you pour in each time. I usually pour about 40 – 50 ml of batter, but of course, it’s all up to you.
11. Open the oven and place a big baking pan directly on the bottom of the oven. Fill the pan with boiling water so that the water reaches 1 cm high. Place the cake pan at the lowest rack and bake at 150˚C (302˚F) in 50 minutes. If the procedures are followed properly, the cake will slowly rise; at 40 to 45 minutes, the cake will be at its peak with golden brown top (and no cracking).
After 50 – 55 minutes, if the cake top is springy to the touch and has a nice golden brown color, then it is ready to be removed from the oven. Let the cake cool down in the pan for 5 – 7 minutes, then turn it upside down onto the cooling rack. Handle gently as the cake is very soft. Remove the parchment paper and let the cake cool completely.
Store cake in the fridge and use in 2 days. Cake is extremely soft, airy and moist, but not at all wet or dense.
*Notes:
– Baking time and temperature may vary depending on the oven. My oven has top heat hotter than the bottom, thus I bake it at the lowest rack of the oven to prevent the cake from cracking or browning on top). Domestic ovens in general are not perfect, so the key is to understand our oven really well and depending on the final outcome (aka cake), adjust baking time and temperature accordingly. You can read more about how to set baking time and temperature to get perfect cakes in this post.
– After removing from the oven, the cake will shrink a little, but not too much, and should not deflate or floppy or cracked side. If it does, possible causes can be:
- Over-whipped egg whites (usually result in cracked top)
- Not enough baking time or incorrect baking temperature: if baking time is too short or baking temperature is too low, cake is not completely baked resulting in a shrinking cake. Solution: leave the cake in the oven for a little while, you may have to increase the baking temperature.
– If cake is cracked on top, in addition to over-whipped egg whites, it can also be caused by cake being placed too close to the top heat. This may be the case when you have a small oven (i.e. smaller than 42L). To fix this, you can follow the instruction here: Preheat the oven at 200˚C (392˚F), place the cake pan in a big rectangular tray, pour boiling water inside the big tray so that the water reaches 2/3 of its height, bake for 17 minutes at 200˚C (392˚F), then 30 minutes at 130 – 140˚C (265 – 285˚F). Then, turn off the oven but leave the cake inside for another 20 minutes before taking it out. I use a big oven so I have not come across this problem myself. This is based on the experience of an acquaintance of mine who is quite familiar with making Ogura cake.


Tks for the recipe. Just to share that I found adding 1 tsp of vanilla essence made the cake taste better. Also I found the 8inch cake tin resulted in quite a short cake. Next time I’ll use the 7 inch one. Good recipe in any case.
Hi! Is the cake supposed to be not sweet? Thanks!
It seems delicious!!!
Hi Linh, did you grease the side of the pan? Thanks before. I love watching your channel. The steps are clear and you use gram in your measurements. Great videos
No I didn’t, it was also stated in the recipe: “Line parchment paper at the bottom of the pan and do not grease the side.”