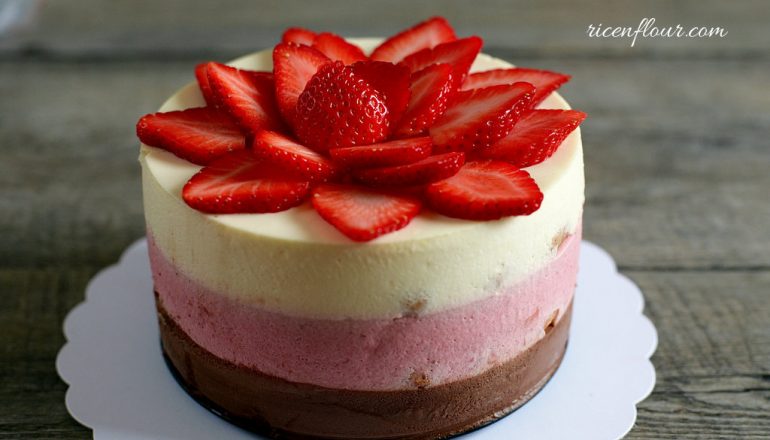
Nothing said fun party and extravaganza like a tri-colour layer cake: why settle for only one, or two layers of colours and flavours when you can have 3 all at once? Today’s show-stopper cake is the Neapolitan Mousse Cake, inspired by the tri-colour Neapolitan ice cream, with its signature chocolate-vanilla-strawberry flavour combination.
Neapolitan ice cream takes its name from the city of Naples in Italy, and the ice cream has three layers because it resembles the tri-colour Italian flag. The reason why chocolate-vanilla-strawberry is the most popular trio is because they were some of the most accessible ingredients when this ice cream was brought over to the US by Italian immigrants, but I have seen other interesting variations like chocolate-vanilla-raspberry, or pistachio-vanilla-cherry.
My friends and I love Neapolitan ice cream at our sleepover parties, because we are all indecisive girls who like a variety of ice cream flavours, altogether in one box. In addition, the light and airy texture of mousse cake is the perfect end to a fairly scrumptious dinner party, therefore, I decided to make Neapolitan Mousse Cake for this special occasion. I usually prepare this cake a day in advance, give it ample time to set and chill in the fridge, before bringing it out and wowing everyone at the end of the party. Although this cake has 6 layers in total, the mousse layers are incredibly easy to put together, and I’m resorting to the versatile store-bought Italian sponge fingers as the base of this mousse.
The main ingredients in a mousse is double cream, which is whipped to soft peak before being folded with other ingredients. Normally, if you’re only making mousse to be served in individual portions, you don’t need to add gelatine, as the mousse will set nicely in the fridge. However, because we are making quite a tall cake today, using gelatine is essential in helping the mousse set properly and firmly support all the layers. I prefer to use gelatine leaves to powder, because the powder can have quite a pungent smell sometimes. If you’re a vegetarian, you can of course substitute the gelatine with vege-gel, and be sure to follow the packet’s instruction on the recommended vege-gel powder : liquid ratio.
EQUIPMENT: 1 16 cm wide, 9-10 cm high mousse ring, or cake tin with removable bottom
INGREDIENTS
A. Chocolate Mousse
- 4 gram gelatine leaves or powder
- 20 ml cold water – to soak the gelatine
- 90 gram chocolate (minimum 45 – 55% cocoa butter)
- 60 gram (57 ml) whipping cream or double cream – to melt the chocolate
- 125 gram (121 ml) whipping cream or double cream (30 – 40% fat) – for whipping
B. Strawberry mousse
- 4 gram gelatine leaves or powder
- 20 ml cold water – to soak the gelatine
- 180 gram strawberries
- 40 gram sugar
- 10 ml lemon juice (optional)
- 125 gram (121 ml) whipping cream or double cream (30 – 40% fat)
C. Vanilla custard mousse
- 4 gram gelatine leaves or powder
- 20 ml cold water – to soak the gelatine
- 1 egg yolk (18 – 20 grams)
- 25 gram sugar
- 10 gram corn starch or all-purpose flour
- 125 gram (ml) whole milk – warm
- ½ tsp vanilla extract (optional)
- 110 gram whipping cream or double cream (30 – 40% fat)
D. Mousse Base
- 25 gram ladyfingers/savoiardi (Italian sponge fingers)
- 100 ml whole milk
VIDEO INSTRUCTION
A detailed recipe with all the specific notes is available on my YouTube Channel (Savoury Days Kitchen) in both English and Vietnamese (select your preferred language by clicking CC > Setting > Language). You guys can check it out at this link or the video right below.
PRINTABLE RECIPE
This Neapolitan consists of 3 layers of mousse, with 3 layers of soaked lady fingers as the base for each mousse layer. The most time efficient way to make this cake is to make the chocolate and the strawberry mousse first, and the vanilla custard mousse afterwards. If you would like to decorate the top of the cake with fresh fruits, this should be done just before serving to ensure the fruits look and taste the best.
1. Line the bottom of the cake tin with greaseproof paper so that you can remove the cake more easily later. The cake looks much nicer with a height, so be sure to get a tin with a high side and a 15 – 16 cm wide bottom.
2. Shave off the sugar on the lady fingers. Some sugar granules don’t ‘mingle’ with the rest of the cake, so I usually get rid of the sugar altogether to make sure that the texture of my mousse cake is completely smooth. However, this is completely optional.
3. Soak the gelatine in part A + B in cold water. Gelatine needs to be soaked for about 10 – 15 minutes to soften before being used.
4. Wash the strawberries and remove the stem. You can also use frozen strawberries if not in season. In a blender, add strawberries with sugar and lemon juice and blend until smooth. The lemon juice helps keep the red colour of the strawberries more vibrant.
5. Pour the strawberry puree into a saucepan. Put the pan on high heat and stir continuously until the puree starts boiling. Turn off the heat and pour one portion of the soaked gelatine into the saucepan, stir to dissolve the gelatine. Pour the strawberry puree into a bowl and leave to cool at room temperature.
* Note: the strawberry puree should be left to cool at room temperature and NOT in the fridge, because the puree can set into jelly in colder temperature.
6. In a bowl, add the chocolate with 60 gram double cream. Place the bowl with the chocolate over a small pot with a little bit of boiling water, stir gradually to melt the chocolate. Make sure the bottom of the bowl doesn’t touch the water, to avoid scorching the chocolate.
7. Remove the bowl of chocolate from the heat. Place the bowl with the other portion of soaked gelatine into the small pot, stir continuously to dissolve the gelatine. Take the melted gelatine out of the pot and leave to cool at room temperature
8. When the strawberry puree and the melted chocolate is almost cooled to room temperature, start whipping the cream. Pour the cream in both part A + B (250 grams in total) into a large bowl and whip until soft peak. I usually leave the cream in the fridge and take it out just before whipping, since cold cream reaches soft peak faster.
9. Making the chocolate mousse:
- Add the gelatine in (7) into the melted chocolate.
- Then, add half of the whipped cream into the melted chocolate. Fold the mixture gently until all the ingredients are smooth and incorporated.
- The melted chocolate should be roughly at room temperature before being mixed with the whipped cream, otherwise the chocolate might solidify in the cold cream.
10. Soak the ladyfingers for 1 – 2 second per side into the milk. The ladyfingers soak up liquid pretty quickly so if you leave them for longer, they may start to disintegrate. Lay the soaked ladyfingers to cover the bottom of the tin – I usually leave a bit of room by the side of the cake not covered by the ladyfingers, so that the mousse will fill up those spaces, which results in a more eye-appealing cake. Pour the chocolate mousse into the tin, and leave the tin in the fridge to help the surface of the first mousse layer set.
11. Make the strawberry mousse while waiting for the chocolate mousse to set. Similar to making the chocolate mousse, pour the cooled strawberry puree in (5) into the rest of the whipped cream, and fold until the mixture is smooth and incorporated.
12. Take the tin out of the fridge, soak the ladyfingers and arrange them on top of the chocolate mousse. Pour the strawberry mousse into the tin. Be gentle while pouring the strawberry mousse, as the chocolate mousse has not yet set completely, and thus may collapse if you pour the next layer in too vigorously.
Leave the tin in the fridge until both layers are set. Meanwhile, prepare the vanilla custard mousse
13. Soak the gelatine in part C.
14. Add the egg yolks and sugar into a saucepan, beat until the egg yolks turn pale yellow. Sieve the flour into the pot and whisk well.
15. Gradually pour the warm milk (you can heat the milk either in the microwave or on the stove) into the beaten egg mixture and keep stirring until all the ingredients are incorporated.
16. Put the saucepan with the custard mixture on medium heat, and stir continuously. Once the mixture starts to thicken, and no longer has the taste of raw flour and eggs, remove from the heat. Immediately, pour the soaked gelatine into the custard and stir to dissolve the gelatine. Pour the custard through a sieve to remove any lumps. Place a piece of cling film directly on top of the custard to prevent a skin from forming, and leave the custard to cool at room temperature.
17. When the custard is cooled, whip the cream in part C till soft peak. Pour the custard into the whipped cream and fold gently until incorporated.
Finally, take the tin out of the fridge, cover the top with soaked lady fingers and pour the custard mousse in. Leave the tin in the fridge for 2 – 4 hours until set completely.
18. Take the cake out of the tin. You can use a thin hot blade (dipped into hot water for about 1 minute) to run along the side of the cake, or use a hairdryer to gently heat the side of the tin for 30 – 40 seconds. The heat will melt the gelatine and the mousse cake will then separate from the tin. However, don’t blow dry the tin for too long, otherwise the layers may start melting and the mousse layers seeping into each other.
19. To decorate, you can top the cake with fresh strawberries or other fresh fruits, chocolate or whipped cream, or whatever your heart desires. The cake needs to be stored in the fridge, and best served fresh or within 2 days.
- Recipe by: Linh Trang
- Written & Edited by: Thao Dan


JOIN US