Mid-Autumn Festival (Tết Trung thu in Vietnamese) takes place on the 15th of the eighth month of the Lunar calendar, when the full moon is said to be the largest and brightest of the whole year. For me, as a child, and for every other child in Vietnam, Tết Trung thu is not only a day to celebrate moon worship but also a true Children Festival. Every child looks forward to the Mid-Autumn Festival party in the ward where they live: the venue hall would be decorated with a range of lanterns of many shapes and colours, all the boys would bring their favourite action figure masks, all the girls would wear their favourite princess costume hats and headwear. There would always be lion dance, and all of us would eventually join in the line and march around the block, dancing to the beat of drums and cymbals, under the bright light of the moon. And of course, what great Mid-Autumn children party can be complete without mooncakes?
Vietnamese children gathering and celebrating Mid-Autumn festival

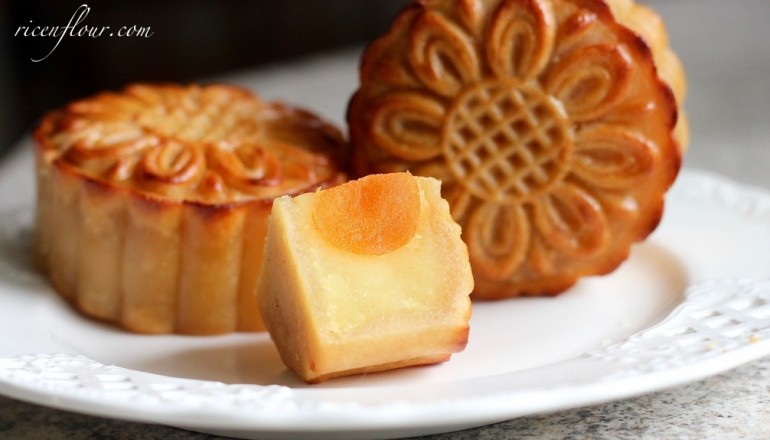
There are two types of mooncakes for Vietnamese Mid-Autumn Festival: baked mooncakes – which are similar to other Asian counterparts, and sticky rice mooncakes – which are also known as snow-skin mooncakes. There is savoury mooncake filling, which is traditionally a mix of dried sausage, salted egg yolk, lotus seeds and watermelon seeds; and there is sweet mooncake filling, normally made with lotus seeds or mung beans or sesame seeds – simple and easy to find plant-based ingredients in Vietnam. In general, sweet mooncakes are a more popular choice with children and go brilliantly well with green tea for adults’ gathering. A picky child as I was (and probably still am), the only mooncakes I would eat is baked mooncakes with sweet lotus seed paste filling and salted egg yolk.
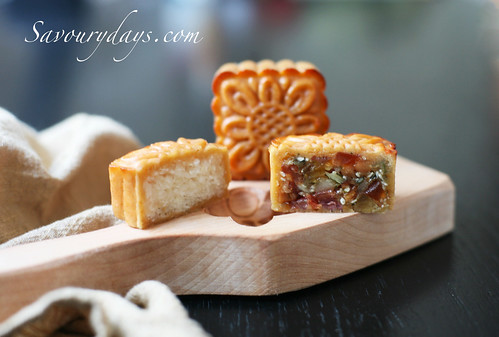
Baked mooncakes with savoury filling (right) and sweet milky coconut filling (left)
Do you ever wonder why the shapes and decorations of mooncakes are so intricate and delicate? Mooncakes, like many other things in Vietnamese culture, hold a deeper symbolic value than what meets the eye. The salted egg yolk in the middle of the mooncakes is as round and as bright as the full moon in the sky at night. The round shape or the square shape of mooncakes represent wholeness and completeness, and even the kids’ mooncakes, which are usually piggy-shape or carp-shape, represent a sense of fullness and happiness. Vietnamese people don’t usually buy mooncakes in well-decorated boxes to consume by themselves, but rather to give as presents to colleagues, friends and relatives, and in return we receive mooncakes as presents as well. That is the give-and-take lesson I learned ever since I was little.
Nowadays, the mooncakes and the mooncake boxes are much more complex than they once were. You would find luxurious seafood-flavoured mooncake fillings, boxes of mooncakes in which the heaviest and most valuable thing is a bottle of wine (which is a strange company for mooncakes). In addition, as people become more health-conscious, less sugar-laden mooncakes such as snow-skin mooncakes or jelly mooncakes are becoming more popular. But to me, comes Mid-Autumn Festival and I would always make a pot of green tea, cut one or two lotus seed paste baked mooncakes, and enjoy them with my beloved family.
Now onto making homemade mooncakes. The idea seemed a bit strange to me at first: because our family always receive mooncakes as presents, it never occurs to me that I can make my own mooncakes. But these days, when the mooncake market is saturated with luxurious (and perhaps ridiculous – I was abhorred by shark fin mooncakes once) gift boxes, a simple box of homemade mooncakes to be given away is, first of all, safer and tastier for consumption, and most importantly, more heartfelt and sincere.
So let us, the writers of Rice n’ Flour, give our readers a series of how to make the best mooncakes at home, as a special present for the coming Mid-Autumn Festival 2016. The series will feature the making of baked mooncakes as well as snow-skin mooncakes, all of which will have detailed instructions and explanations on both ingredients and methods, in order to help even the rookie bakers create the best treats. We will first get you familiarised with the traditional Vietnamese-style mooncakes, and then gradually, from the basics, depart into other methods and recipes that will help you customise your own favourite mooncakes.
Be sure to check out how to make your own salted egg yolks at home here and golden syrup here, before you get started on preparing for the best Mid-Autumn Festival ever.
How to Make Baked Mooncake Skin
All mooncakes have two components: the crust and the filling, and the difference between baked mooncakes and snow-skin mooncakes is, you guess it, baked mooncakes are baked to cook the crust and give it a golden brown exterior, while the skin of snow-skin mooncakes are made from sticky rice dough.
Making mooncakes is a precise science, so I would recommend following my instructions and trying to understand each component in this recipe before you can DIY your own mooncake recipes.
INGREDIENTS
- 240 grams flour (I used 120 grams cake flour (protein 8%) and 120 grams bread flour (protein 11%))
- 160 grams golden syrup
- 30 grams peanut oil or vegetable oil
- 1 egg yolk (18 – 20 grams)
- 10 grams (2 heap teaspoons) creamy peanut butter
- ¼ teaspoon five-spice powder (only used when the filling is savoury)
*Ingredients Explained:
– One recipe yields about 450 grams mooncake dough. Depending on the type of moulds you’re using (round or square) and your own preference on the thickness of the mooncake skin, you can adjust the amount of dough used for each cake. Usually, I use the ratio skin : cake of 1 : 3, that is: if the mooncake weighs about 75 grams, I will use about 25 grams dough and 50 grams filling. Therefore, this recipe will be enough for 18 mooncakes, weighing 75 grams each. You can increase the ratio if you prefer the skin to be a little bit thicker.
– Flour is the main ingredient of this recipe, thus it greatly determines the quality of the mooncake skin. The lower the protein content of the flour, the softer and more tender the mooncake skin. As a result, traditional mooncake makers usually use cake flour (with 8% protein content). On the contrary, using all-purpose flour or bread flour, which has a higher protein content than cake flour, will produce a drier and more crumbly mooncake skin.
– Some recipes use alkaline water (also known as lye water) and/or baking soda in order to make the skin soft and golden. However, I do not use these two ingredients in my recipe and do not see any differences in the colour and the texture between my mooncakes and the store-bought ones.
– Instead of lye water/baking soda, I use egg and peanut butter. They help give the skin the desired golden colour, and add a nice nutty flavour.
*Note:
– The dough produced from this recipe is rather soft and moist. If your cake skin turns out to be dry or hard, consider these factors:
- Golden syrup which has just been made or was made for a while (the former tends to be a more common issue as it has not yet thickened and is still quite runny).
- Old flour or flour with a high protein content will result in a dry and hard dough, compared to new flour or flour with a lower protein content.
- Oven temperature is too high, cooking time is too long.
– If your dough is too moist, or in case of sweet mooncakes whose fillings are quite oily (for example, lotus seed paste or mung bean paste filling) and therefore the oil softens the skin quite quickly when you leave the mooncakes overnight, check out these solutions:
- Leave the yolk out from the recipe, add 10 grams of oil instead if the dough is too dry, and bake the cake 10ºC higher than the temperature indicated in this recipe.
- Use flour with a high protein content such as AP flour, bread flour.
- Once you finish baking, set the oven at 110 ºC/ 230 ºF and bake the mooncake for a further 5 – 10 minutes so that the skin will dry out a bit more and be more crumbly.
INSTRUCTIONS
Video instruction has been posted on the Youtube channel of Savoury Days. You can watch it below or through this link. Remember to switch the video to HD for the best visual experiences 
This recipe has been posted on Savoury Days – Rice n’ Flour’s ‘Vietnamese sister’ – since 2014 and has been one of the most popular recipes in demand. So probably I can call it ‘fool-proof baked mooncake recipe’
PRINTABLE RECIPE
A. The dough
1. Sieve the flour into a large bowl.
2. Make a well in the middle of the bowl. Add the rest of the ingredients into the well.
3. Using a spoon, gently stir the mixture in a circular motion from the middle of the well outwards, slowly incorporating the dry and the wet ingredients.
4. Keep stirring until the ingredients are roughly combined. Then, use your hand to gently knead and form a dough. The dough will be a little bit wet at first. If you feel that it is too dry and crumbly, add a bit more oil or golden syrup.
5. Cover the entire dough using cling film or greaseproof paper to prevent the dough from drying. Leave it to rest at room temperature for 30 – 45 minutes.
B. Pre-shaping
While the dough is resting, prepare the fillings and the mould to shape the mooncake.
Before preparing the filling, you need to decide the “size” or weight of your mooncakes. This actually depends on the sizes/ cavity of your moulds. Each mooncake mould has its own cavity and this is normally stated on its package. Once you have the weight of your mooncakes, the general rule is to use 1 part dough/ skin and 2 parts fillings for each mooncake. For example, if you are going to make 150-gram-mooncake, then in each mooncake, the dough weighs 50 gram and the filling weighs 100 gram.
You can use store-bought fillings but it’s not difficult to make homemade filling. Homemade filling also tastes better and less sweet (from my own experience) than the store-bought. So if you’d like to try, you can watch my tutorial on making homemade mung bean filling here.
Note that the filling should be made in advance and let cool completely before being used for mooncakes.
Once you have the filling, all you need to do is to divide them into small portions (with the ratio explained above), then shape them into small balls. If you are using salted egg yolk, remember to include the weight of egg yolks into the total weight of the filling.
Don’t forget to wrap the filling balls while waiting for the dough so that they won’t turn dry.
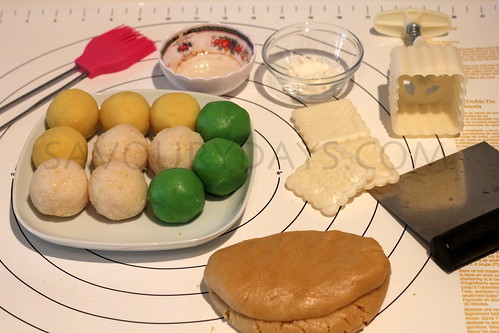
Mung beans, pandan and coconut fillings

2. Prepare the tools to shape the mooncakes:
- Scale to weigh portions of mooncake dough
- Mooncake moulds
- Clean flat working surface
- Rolling pin (or you can use a clean wine bottle – truly classy!)
- 1 tablespoon (15 grams) flour – for dusting
- Oil + a brush to prevent the dough from sticking to the mould
- Baking tray lined with SilPat or greaseproof paper
I recommend using oil to make the mould non-stick rather than using flour. Not only is it more effective, but also when you coat the mould with flour, the flour tends to be stuck in the nooks and crannies of the mould, which makes the shape of latter mooncakes less defined and makes cleaning up much more difficult. Additionally, I find that the mooncakes coated with oil tend to hold their shape in the oven better than those coated with flour.
Mooncake work station is ready!
C. Shaping the mooncake
After resting for about 30 – 45 minutes, the dough will become more elastic and less sticky. However, if your dough is still a bit too dry, add a bit more golden syrup/honey/oil and knead lightly. Similary, add a bit more flour if the dough feel too sticky or wet.
1. Using the scale, divide the dough into small equal portions. Prepare a piece of cling film or a damp towel to cover the dough during this step to prevent the dough from drying out.
2. Dust your hands with a bit of flour and pat off the excess. Shape a piece of dough into a small ball. Dusting your hands instead of the dough with flour will help prevent over-flouring the dough and drying it out.
3. Using a rolling pin slightly dusted with flour, rolling the dough into a circle disk. The edge of the dough should be a little bit thicker than the middle. The diameter of the rolled out dough should be roughly twice that of the filling. You will continue to stretch the dough while shaping, therefore, don’t roll out the dough too much, otherwise the skin wrapped around the filling will not be tight enough.
4. Wrapping the mooncake:
– Put the filling in the middle of the dough, gently wrap the dough tightly around the filling, leaving no air between the skin and the filling.
– Stretch the dough from the bottom to the top so that the dough completely covers the filling. You can do this by holding the cake between your thumb and index finger, and utilise this gap to carefully stretch and wrap the skin. Use your other thumb and index finger to pinch the edge of the dough on top.
– Once the filling is completely covered, make sure all the edges are sealed and the skin around the filling is an even layer. If there is air between the filling and the skin (you can detect this if you find a thicker or softer patch of skin on the cake), use a toothpick to poke out the air and then seal back the dough.
– Continue until you have finished all the fillings. If you are making a large batch, prepare some cling film or a clean damp towel to cover the wrapped mooncakes, preventing them from drying out. Alternatively, since dried out mooncakes are harder to shape, you can mould each mooncake right after wrapping.
5. Preheat the oven at 190 ºC/ 374 ºF (top and bottom heat). Prepare a baking tray lined with parchment paper. Don’t use the black baking tray that comes with the oven, as it conducts a lot of heat and will likely burn the bottom of your mooncakes.
6. Moulding the mooncake:
– Brush the inside of the mould with a thin layer of oil. Using a brush will help spread oil thinly and evenly, so that the mooncake after moulding will not be too oily.
– Dust a bit of flour on the bottom of the cake to prevent the cake from sticking to the surface while moulding. You can use a toothpick to poke a few holes on the bottom of the cake to allow the cake to ‘ventilate’ while baking (however, this is optional, as I did not do this step myself). Put the mooncake into the mould and press it down lightly.
– If you are using a spring-form mould, put the mooncake on the table so that you will have a sturdy surface while moulding. Put the mould on the table with the mooncake inside, steadying the mould with one hand and pressing the lever with the other. Afterwards, carefully removing the mould.
– If you are using a regular mould, you just need to put the mooncake inside the mould and use your hands to ‘spread and press’ – fill the mould with the mooncake, and then you are done.
– Transfer the mooncakes onto the baking tray. Be extra careful, as the mooncakes are very soft and fragile after moulding
D. Baking the cake
A regular oven should take about 10 – 15 minutes of preheating to reach the desired temperature. Make sure that your oven setting is switched to top and bottom heat.
1. Bake the cake at around 190 ºC/ 374 ºF. The temperature will vary depending on the size of the mooncakes. I usually place the tray one rack below the middle of the oven. For 50 – 75 gram mooncakes, it takes around 5 – 7 minutes to bake; and 8 – 10 minutes for 100 – 125 gram mooncakes. When the mooncakes start to turn golden, take them out and spray them with a bit of water to prevent the crust from being too dry. Leave the mooncakes to cool down for 5 – 10 minutes and then brush them with a layer of egg wash.
*Temperature explained:
- There are a few recipes which call for a very high temperature, from 200 – 220 ºC. I have tried baking at this temperature, however, the mooncakes turned out a funny shape: the top and the bottom ‘swelled’ very quickly, which resulted in the side of the mooncakes curving inwards.
- 180 – 190 ºC is the ideal temperature, however, actual oven temperature may vary from the oven temperature setting, depending on your type of oven. Smaller, table top ovens tend to be hotter, and the temperature may not be even throughout the oven. If you are a regular baker, I would recommend buying an oven thermometer.
2. While waiting for the mooncakes to cool down, prepare the egg wash:
- 1 egg yolk (for a golden brown mooncake skin)
- ½ egg white (for a shiny skin)
- 1 – 2 teaspoons milk (helps to liquefy the wash, easier to brush onto the cakes)
- ½ – 1 teaspoon sesame oil (for aroma and shiny skin)
- 1 – 2 drops red food colouring or ½ teaspoon honey/golden syrup (for a golden brown mooncake skin). Honey/golden syrup will give the mooncakes a deeper golden brown hue, however, don’t use too much of it, as its sugar content can make the mooncakes sticky.
If you want a darker brown colour, you can use several other ingredients such as black sesame oil, a few drops of coffee or soy sauce.
Mix all of the ingredients above and put them through a sieve.
3. Brushing technique:
– After 5 – 10 minutes when the mooncakes have cooled down and absorbed all the water, lightly dip a brush into the egg wash and brush onto the cake.
– The egg wash should be very thin, just enough to cover the skin. Brushing liberally will not produce a more beautifully golden colour, but rather make the mooncakes lose the decorative pattern on top, since the egg wash is too thick.
– A soft, small pointed brush will be more effective than a hard large brush or a silicon brush. While brushing, make sure to brush an even layer throughout, and don’t leave any egg wash get stuck in between the nooks and crannies on top of the mooncakes. Brush through any air bubbles (using a clean brush) if necessary.
– I like my mooncakes to be golden all around, thus I usually brush the egg wash on the side of the mooncakes as well. You can use a larger brush for this, and brush in an up-and-down motion.
4. Return the mooncakes to the oven at 190 – 200 ºC/ 374 – 392 ºF for about 5 – 7 minutes (higher temperature and shorter baking time, compared to the first bake). When the surface has dried and turned a bit more golden brown, take the mooncakes out, spray them with water and brush with egg wash again.
You can brush the mooncakes 2 – 3 times, but no more, otherwise the decoration on the mooncakes will be less defined.
Let the mooncakes cool down a little bit before transferring them to a rack to cool down completely, as the freshly baked mooncakes tend to be very soft. Letting the mooncakes cool on a rack will help prevent oil from accumulating at the bottom of the mooncakes.
Freshly baked mooncakes will have a light golden colour, and will turn shiny golden brown overnight. After 2 – 3 days, when the skin has absorbed the oil from the filling and become more moist, the mooncakes will have a deep golden brown colour. Mooncakes with oily fillings (like mung bean) tend to soften quicker than less oily mooncakes (such as savoury ones or coconut filling ones).
When the mooncakes have cooled down completely, put them into airtight bags or boxes with dry-packs (moisture absorbing packets). Homemade mooncakes should be served as soon as possible (but not right after baking, as the skin is still quite crumbly and flaky), preferably within the first 3 days. If you want to keep them for longer than 5 days, you should store them in the fridge, but the flavour may be compromised a little bit.
Happy baking and watch out for the next episode of this Mid-Autumn series
——————————–——————————–
- Recipe & Photos: Linh Trang
- Written & Edited by: Thảo Đan


I have problem with my mooncake..after storing them for a few days in air tight container..my mooncake become too oily..can you please solve my problem..tq..
Hi, I need a bit more details: which kind of filling is your mooncake? how many days have you stored them? Did you use egg yolk in your dough?
I used mung bean,redbean n pandan paste filling which i bought from shop.
I think after 2 days..
used yolk for egg wash only..
Hi
Where is the recipe for the filling?
Thanks
You can watch the video tutorial here: https://www.youtube.com/watch?v=1zBuf2O9oX4&feature=youtu.be (this link was included in the post above, too). The video has an English subtitle, you can activate it by clicking the button CC on the screen. In the Mid-Autumn festival playlist on my youtube channel, there’s also a tutorial for lotus paste. And in the traditional snowskin mooncake recipe (http://www.ricenflour.com/recipe/how-to-make-traditional-snow-skin-mooncakes-recipe/), there’s a recipe for green tea (matcha) filling, which can be used for baked mooncakes too.