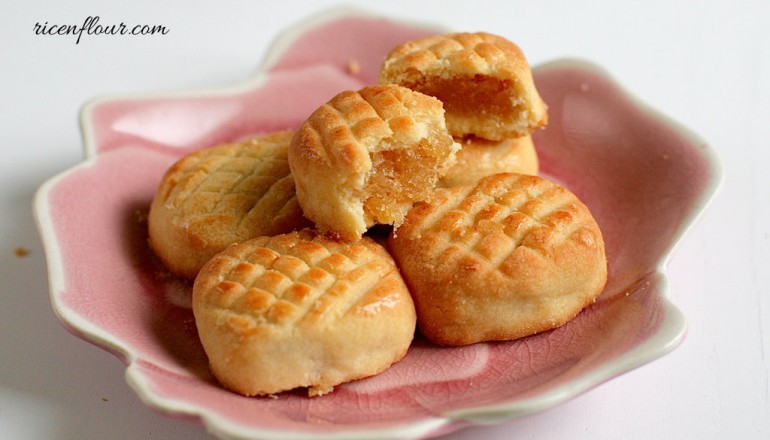
It is almost Lunar New Year! I remember when my father went on a business trip around this time to China, he always brought back this sweet delicacy called Feng Li Su (鳳梨酥). When I was small, I never quite understood why it’s always just around Lunar New Year when I got to eat them but I absolutely loved them. And I still do. But now I also discover that it is actually a famous pastry and a popular new year gift in Taiwan. These tiny treats has an extremely buttery, melt-in-your-mouth crust that encases a gorgeous portion of rich, tart, jam-like pineapple filling in the middle. Who could deny such treats, tell me.
After quite a bit of research, I finally nailed it down to 2 recipes that I really like. One requires quite a large amount of butter, which results in cakes that are very soft, very buttery, but also quite crumbly. The second requires some additional ingredients including cream cheese and whipping cream, which I believe is a newer version of this traditional sweet. This recipe also gives soft, melt-in-your-mouth cakes that are sturdier and not so crumbly. Both of these recipes taste good, choose the version you like.
Now comes the filling. The traditional and also all-time-favorite has always been pineapple; but other options are absolutely do-able, such as carrots, kiwi, pineapple-mango, pineapple-strawberry, desiccated coconut… As long as they are foods that are rich in fiber or doesn’t have too much liquids, they can be used as fillings. Otherwise, it may get difficult trying to thicken them into jam. But mind you, the filling I will be introducing now is no ordinary filling. I will be using pineapple and durian meat. The idea of incorporating this ‘smelly’ South East Asian fruit is absolutely crazy (I know) but the result is brilliant! It’s so rich and sweet with a hint of tartness; it’s just amazing. I may try using a little bit of salted egg yolk crumble next time to see how it will end up tasting; who knows, it may even become an explosion of flavors. Yeah, flavor bombs, I like that 
Anyhow, let’s get started before I get any wilder.
TAIWANESE PINEAPPLE SHORTCAKES RECIPE
Make: 35 small-sized cakes (20 grams)
INGREDIENTS
A. Sugar Syrup
- 100 gram sugar
- 100 ml water
- 10 ml lemon juice (do not use lime since it will impel bitterness)
B. Pineapple-Durian Filling
- 320 gram pineapple (peeled, eyes removed); or 320 gram canned pineapple
- 260 – 280 gram durian meat (seed removed)
- 60 gram sugar (more or less to taste)
- 15 – 30 ml sugar syrup (from A)
C. Shortcake Dough (method 1 – soft, chewy, melt-in-the-mouth, not so crumbly)
- 70 gram unsalted butter – room temperature until very soft but not melting
- 30 gram cream cheese – room temperature until very soft
- 60 gram whipping cream (30 – 40% fat)
- 35 gram icing/powdered sugar – should not be substituted with other types of sugar
- 1 egg yolk (18 – 20 gram)
- 145 gram AP flour
D. Shortcake Dough (method 2 – soft, buttery, melt-in-the-mouth, quite crumbly)
- 120 gram unsalted butter – room temperature until very soft but not melting
- 35 gram condensed milk (do not substitute with sugar)
- 1 egg yolk (18 – 20 gram)
- 150 gram AP flour
*Notes:
- You can also use different fillings such as pineapple, carrot, kiwi…
- Margarine can be used in place of butter but the baked cakes will not taste quite as good.
- Use AP flour (10 – 11% protein content). Using cake flour (8% protein content) will give a flour-y taste to the cakes; whereas using bread flour (13% protein content) will result in dry and crumbly dough.
- Homemade sugar syrup can be substituted with corn syrup, maple syrup, or maltose.
INSTRUCTIONS
A detailed recipe with all the specific notes is available on Savoury Days’ YouTube Channel (subscribe to get all the newly uploaded recipes) in both English and Vietnamese (select your preferred language by clicking CC > Setting > Language). You guys can check it out at this link or the video right below.
PRINTABLE RECIPE
A. Sugar Syrup
1. In a pot, put in sugar and water. Place on high heat and stir until all the sugar has been dissolved. Stop when water starts evaporating.
2. Turn heat down to medium. Add in lemon juice, and twirl the pot gently to mix it with the sugar syrup. When the water has been evaporated to half, remove pot from heat and transfer the syrup into a bowl or jar to get cool.
B. Pineapple-Durian Filling
1. Process the pineapple chunks in a blender or food processor into puree. If you prefer the filling to have a little bit of crunch, do not blend for too long so that you still have some shredded pineapple left.
2. Transfer the pineapple puree into a non-stick pan. Add in durian meat and sugar. Reduce the sugar if you desire as we will also be using sugar syrup later on.
3. Cook the mixture over high heat and stir occasionally until the pineapple, durian meat, and sugar become incorporated. When the liquid is almost gone and the mixture becomes more paste-like, turn the heat down to medium. Taste and add sugar syrup if you want more sweetness; or add lemon juice if the mixture is too sweet. Keep stirring the mixture over medium heat until it becomes a soft, firm paste. From 600 gram of pineapple and durian meat, you should be able to get approximately 350 gram filling. Depending on the cooking temperature and the amount of filling, cooking time can vary between 45 to 90 minutes.
*Notes:
– During the last few minutes, the mixture should be cooked over low heat to allow the liquid to evaporate more slowly. This allows for more control and thus prevents the mixture from being burnt.
– Do not over-cook the mixture as it can get hard.
– Do cook the mixture until it is completely dry. Wet filling will create vapor inside the casing during baking, causing the dough to expand and crack.
– Squeeze in a few drops of lemon while cooking will help preserving the original color of the pineapple. Otherwise the filling may get brown.
– If the filling is not quite incorporated, reasons may be that it is still wet or it needs more sugar.
C. Shortcake Dough
** Method 1 (using butter, cream cheese, whipping cream)
1. In a large bowl, put in butter, cream cheese, and sifted icing sugar. Beat at the lowest speed until smooth.
2. Add in egg yolk, beat till blended.
3. Add in whipping cream, beat till blended.
4. Divide the flour into 2 portions and sift each portion into the bowl, beat till blended.
5. When all the flour has been used, using your hands, gently knead until it forms a dough ball (this ball will be a little wet). Cover it tightly with plastic wrap and place it in the fridge for at least 1 hour until the dough becomes firmer and not sticky. You can also put it into the freezer for storage; defrost in fridge before use.
*Notes:
– Butter and cream cheese need to be at room temperature when they are at a very soft stage but not melting.
– Hand-blend, or machine-blend at the lowest speed setting. Only mix until just incorporated. Do not over mix, especially after adding flour or the dough will become chewy.
– Do not knead for too long as the dough can turn chewy and lose its pattern that we will later on create before baking to give the cakes a more enhanced look.
– Do NOT store the dough in the fridge for too long. If you are not going to use it in the day, better to store it in the freezer.
** Method 2 (using butter and condensed milk)
1. In a bowl, put in butter and condensed milk. Blend them using a spoon or a hand mixer at the lowest speed setting.
2. Add in egg yolk, mix till blended.
3. Divide the flour into 2 portions and sift each portion into the bowl, mix till blended.
4. When all the flour has been used, using your hands, gently knead until it forms a dough ball (this ball will be a little wet). Cover it tightly with plastic wrap and place it in the fridge for at least 1 hour until the dough becomes firmer and not sticky. You can also put it into the freezer for storage; defrost in fridge before use.
*Note for both methods: Different brands of flour have different water absorption capacity; thus the dough can have varied degree of wetness. If the dough is too dry, the baked shortcakes will come out very crumbly, pasty, or hard. Depending on the situation, you will have to increase or reduce the amount of flour used. If the dough is too dry, you can also add a small amount of egg yolk or cooking oil.
D. Shape and Bake
1. Divide the filling into small portions, each weighs 10 grams, shape them into balls. Similarly, divide the dough into small portions, each weighs 10 – 12 grams. This recipe yields 35 small shortcakes. With this ratio, the skin will be quite thin. You can use more dough if you prefer a thicker skin.
2. Line the baking tray with parchment paper. Do not use the black tray that usually comes with small ovens as black tray absorbs heat faster, which can cause the cakes to burn out more easily.
3. Dust your hands with a little bit of flour. Get a piece of dough and shape it between palms to form a ball, then press down slightly to flatten it out. Then, place the filling in the center of the flattened dough ball and wrap it until the filling is completely covered. It is important to make sure there is no air between the filling and the dough because if air is trapped inside, the dough will expand during baking, resulting in undesirable cracks on the cake surface. Place that ball on the baking tray and continue with the rest of dough and filling. You can also make other shapes (rectangular, oval…); dust your hands with flour if it gets sticky.
If you live in hot area or you enjoy the slow pace, it is better to keep the dough in the fridge to avoid butter from melting and sticking too much to your hand.
4. Preheat the oven at 180˚C (355˚F), top and bottom heat.
5. Dip a small knife in water, then use the dull side of the blade to create pattern for the cakes. For dough using method 1 (cream cheese), it is better to make a deeper cut as it lose the pattern more easily as compared to dough using method 2.
6. Beat an egg yolk with 5 ml milk. Gently apply this egg wash mixture onto the cakes. Do not brush too much as this may cause the cake surface to crack during baking.
7. Bake on the middle rack, 180˚C (355˚F) in 15 – 17 minutes until the shortcakes become dry; cakes are easy to be lifted off, and turn golden brown color.
8. Remove tray from heat and let the cakes cool on tray. Do not move the shortcakes while they are still hot and easy to break. When the cakes has been cooled, store in an airtight container (preferably with desiccant pocket) and keep in cool, dry place. Use up in 1 week.
*Notes:
– Shortcakes using method 2 (no cream cheese) will be a little browner than those using method 1. If you prefer the golden colour, add some sugar syrup or honey to the egg wash mixture.
– When putting the tray into the oven, the oven should be very hot so that the dough can firm up quickly, maintaining its form. You can also preheat the oven at 200˚C, then turn it down to 180˚C after putting the tray into the oven.
– Do not bake for too long; otherwise the shortcakes will be dry and crumbly (especially with method 2).
– If the surface of the cakes crack, reasons can be that the filling is too wet or cakes were baked at the temperature that was too high for long period of time.
– You can reduce the amount of sugar but less sugar used means shorter storage time


ok, I love your blog, these are the things I love to eat! Thanks for posting such detailed instructions, and suggesting different fruit fillings. Bookmarked.
OMG! A friend brought some store-bought wrapped versions of a cake similar to this back from a trip to Taiwan and I fell in love instantly. Now I can make them myself! Thank you!
Good luck! ^^ I hope you will find the taste of this cake similar to those in your memory.