So, we are heading right into the last quarter of the year. It’s time when we can officially go absolutely maniac over pumpkins, pumpkin-themed activities, and of course, sweet and savoury pumpkin dishes. At where I live, whenever I go to the superstore or visit the farmer market, there will be a huge outdoor section where they put pumpkins out for sale; pumpkins of all kinds, from the tiny pumpkins used for cooking to the gigantic pumpkins used for Halloween decorations. For many of us, fall means the change of season, the time for family gathering, the time for scary spooky things, for exciting Trick or Treat, and who can forget, it’s the time for stash of delicious pumpkin pies and Jack O’ Lantern carved pumpkins at your doorstep.
Now, you may already know that I love buns, especially the soft airy kind. And while on a quest of putting this seasonal delicacy into good use, I thought I should just as well incorporate it into these buns, pumpkin buns in actual mini pumpkin shape! Believe me, they are not difficult to make at all and I’m sure if you are going to serve this at a party, your guests will be wow-ing in awe. You will not be disappointed at the taste, the aroma, and the looks of these super cute and super delicious treats. Have I got you excited for pumpkin buns yet?

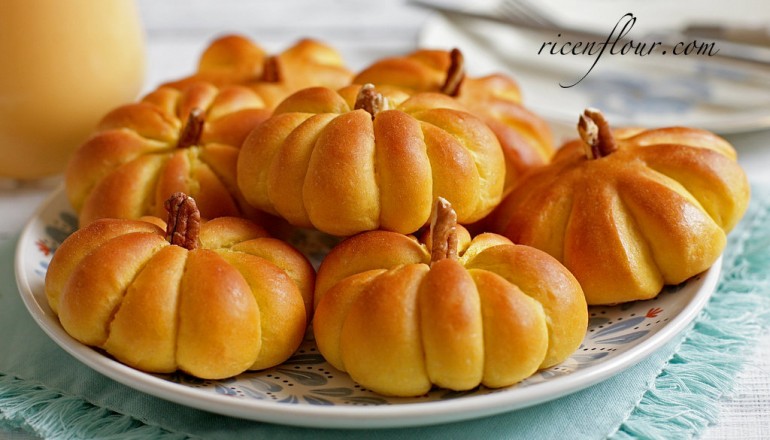
PUMPKIN DINNER ROLLS & PUMPKIN SMOOTHIE RECIPE
TOOLS: Baking tray and silicon baking mat or parchment paper
MAKE: 15 buns
INGREDIENTS:
- 1 kg pumpkin (about 2 lb. pumpkin, I prefer to use butternut squash)
- 120 ml (1/2 cup) milk – lukewarm
- 42 gram (3 tbsp) unsalted butter – melted (if using salted, omit the salt in recipe)
- 1 medium egg (60 gram including shell)
- 50 gram (1/4 cup) light brown sugar
- 3 gram (1/2 tsp) salt
- 6 gram (2 tsp) instant yeast
- 325 – 350 gram (~ 2.5 cup) all-purpose flour
- About 1 L milk and 100 – 200 gram sweetened condensed milk to make pumpkin smoothie
*Notes:
- If using canned pumpkin puree, use about 130 gram (1/2 cup) for this recipe.
- This recipe requires instant yeast (that needs no activation before use).
- 50 gram of light brown sugar can be substituted with 40 gram white sugar. This bread is not very sweet as I intend to make it to compliment dinner, if you want to make it sweeter, feel free to add more sugar.
INSTRUCTIONS:
A detailed recipe with all the specific notes is available on Savoury Days’ YouTube Channel (subscribe to get all the newly uploaded recipes) in both English and Vietnamese (select your preferred language by clicking CC > Setting > Language). You guys can check it out at this link or the video right below.
PRINTABLE RECIPE
1. Peel the pumpkin, cut and remove all seeds, then slice into small pieces. Place the pumpkin slices onto a tray lined with aluminum foil. Cover the tray completely with another layer of aluminum foil. Bake at 230˚C (446˚F) in about 30 – 40 minutes until the pumpkin slices are tender and can be easily mashed with a fork. Take the tray out; mash the pumpkin or blend it in a blender until it becomes smooth puree.
- Baking time will vary depending on type and ripeness of the pumpkin
- You can also choose to steam the pumpkin but baking will give out more flavour
2. In a large bowl, add in milk, melted butter, 130 gram (1/2 cup) mashed/pureed pumpkin. Gently beat an egg and measure out 25 gram (1/2 egg). Add this 25 gram of beaten egg into the bowl, mix well with the other ingredients. Keep the remaining beaten egg for egg wash later on.
3. Add sugar and salt into the bowl.
4. Add instant yeast and mix well. Note: the temperature of the mixture should not be higher than 40˚C, otherwise yeast may die.
5. Sift in flour and mix until the batter looks incorporated. Gently knead with your hands. When the dough becomes somewhat homogenous, use a damp towel to cover the bowl and let it rest in 10 – 15 minutes.
6. After 10 – 15 minutes, knead the dough until it becomes smooth and elastic. The dough is tacky but not sticky when touched with our fingers. Besides, it can be stretched out into a translucent windowpane without breaking.
*Notes:
– The amount of flour used will vary depending on water absorption capability of each brand. For this recipe, you will need somewhere between 300 – 350 gram of flour. If you are going to knead the dough by hand, in the first 5 minutes, the dough will be quite sticky. But it will get better as you keep kneading. If after a while and the dough is still sticky, add in more flour. If you go overboard with the flour and the dough now becomes hard and difficult to knead, add in some teaspoons of milk, one at a time, until the dough becomes soft enough to knead (hard dough will result in hard, dry bread that cannot be stored for long time).
– You can also use a mixing machine with dough hooks to knead the bread.
7. Grease the proofing bowl with a little oil. Place the dough inside the bowl and turn it around so that it is covered with oil (to prevent the dough from drying out). Cover the bowl with a damp towel. Proof at room temperature until the dough doubles in size. Proofing time will be between 45 – 70 minutes, dough will proof faster at warmer temperatures.
8. After the first proof, take the dough out of the bowl and knead for another 2 – 3 minutes until the dough is smooth. Divide the dough into 15 equal portions, each weighs about 40 – 45 gram.
9. Shape the dough pieces into balls. Prepare a baking tray that is lined with parchment paper or silicon baking mat.
10. To make the pumpkin shape, there are 2 methods: (pls check the video for visual instructions on both of these methods)
– Method 1: Cut the dough using a pair of scissors:
- Place the dough balls onto the tray so that they are about 3 – 4cm apart from each other.
- Dust your hands with some flour, gently flatten the ball a little
- Dip the tip of the scissors into oil. Using the scissors, cut the dough into “petals”. The dough should resemble a flower.
- Do remember to dip the scissors into oil before use as the oil helps the cut petals to stay apart and not sticking back together during the second proofing and baking.
– Method 2: Tie the dough using thread:
- Use a long thread to tie around the dough ball in a way that the ball is divided into 8 parts.
- Do not tie the ball too tightly as it will continue to rise a lot more during the second proofing and baking.
* Pros and Cons in each method:
– The first method can be done very quickly and easily, the end result looks nice, but it won’t give a realistic look of a pumpkin as the second method will. In addition, you cannot add filling if using method one.
– The second method gives very realistic looking pumpkin buns; as well as filling of your choice can be added. However, this method is much more time consuming as the tying and un-tying process may get tedious.
– In the video, I use Laughing Cow’s cheese but you can also use other choices of filling such as egg custard, red bean paste… But, do remember not to use too much filling (filing should only weigh 1/3 of dough); otherwise it may leak out during baking.
11. After you finish shaping the dough, cover them by placing another big tray or big container on top. Proof for the second time until the dough rises to 75%. The dough should be covered tightly to prevent them from drying out.
12. Preheat the oven at 180˚C (356˚F) (Start this when the dough rises to 70%).
13. Use the remaining 25 gram of beaten egg and mix it with 5 ml (1 tsp) water and let it pass through a sieve. Using a small brush, gently brush a thin layer of egg wash onto the surface of the dough. This will help the baked buns to have a shiny, golden brown crust.
Then, use the tip of a chopstick or something similar to make a small hole in the centre of the dough. This is where you will be putting the stem on.
14. Bake at 175 – 180˚C (347 – 356˚F) in 20 – 22 minutes until the buns become golden brown. If you are making smaller or bigger buns, baking time will need to be adjusted. Don’t bake for too long or the buns will dry out.
After about 17 minutes, rotate the tray so that the buns are evenly baked.
15. Remove the buns from the oven. When they are still hot, brush a thin layer of whipping cream or butter onto the surface; this helps to create an even shinier surface and also to give more aroma to the buns.
If using the second method, let the buns cool down completely before cutting the thread.
16. Break a pecan in half and put it in the hole at the centre of the bun to make the stem. Another option is to use a short stick of cinnamon, which will also add a very nice aroma to the buns.
Use up in one day or store in an airtight container for use in 2 days.
PUMPKIN SMOOTHIE
Either from using one whole pumpkin or canned pumpkin puree, after this, you should have lots of pumpkin leftover. This can be used to make this easy and delicious pumpkin smoothie, following these steps:
– In a blender, add in mashed/pureed pumpkin and milk in a 1:2 ratio. For example, for 100 gram pumpkin, use 200 ml milk.
– Blend it well. Another option is to use a balloon whisk and whisk it by hand. If the mixture appears to be too thick, add more milk.
– For sweetening option, feel free to use any kind of sweeteners, sugar, sweetened condensed milk, honey, maple syrup…
– Milk can also be substituted with other alternatives such as almond milk, rice milk, coconut milk…


Oooops! Oh my word, so sorry. Forget my previous comment. I was looking at the directions in my excitement (LOL) and totally missed that you had the actual recipe right there – with all the measured ingredients. Thanks again.
Can’t wait to make these – you are soooo creative. I noticed that you divided the butternut squash between the dough and the smoothies. But how much of the pureed squash did you actually use in the dough? I don’t want to add too much as it might come out mushy. Thank you in advance for your reply.
These look amazing and I want to make them for thanksgiving. Have you ever made them more than 2 days in advance and froze them? if so, did they keep?
Hi Leah, I’m sorry for my late reply. I’ve never freeze these buns but theoretically, we can freeze almost all kinds of sweet and rich bread like this and thaw in the fridge. So I guess it should work.
So Adorable!!!
Hello! These rolls look beautiful! If you make them again soon, will you post photos of the tying? I would love to make them, but I’m not sure I understand the method. Thanks!
Never mind! I just saw the video – i get it now! Thanks!
I love these dinner rolls they sound delicious and extremely cute!