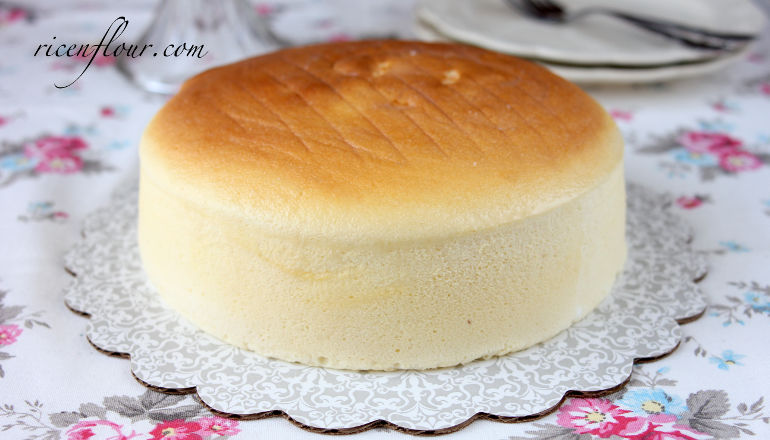
Japanese Cotton Cheesecake (JCC) is probably one of the most amazing cheesecakes that I have known in my life. I fell in love with it right at the first time I tried it. And until now, it is still in my most-favourite-cake-of-all-time list.
JCC is a special cake because it is the combination of a chiffon cake and a cheesecake. On the one hand, its method is pretty identical to chiffon method, which is to mix the liquids, fats, egg yolks, and flour together, while beating egg whites separately in a different bowl. Once the egg white is ready, we fold it into the egg yolk batter, and then bake. Thanks to the whipped egg white, the cake has a super fluffy, tender and light texture, just like a chiffon cake. On the other hand, the large portion of cream cheese in the ingredients of JCC gives it a rich, creamy, smooth and melt-in-the-mouth taste, which is very much similar to the taste of a cheesecake.
To sum up, JCC features both Chiffon cake’s and Cheesecake’s characteristics: it is smoothly soft, light, fluffy, spongy yet moist and creamy at the same time (Where can we find a dessert which is better than that?  ). However, the “dark-side” of a JCC is the procedure to make it. As being the combination of a chiffon cake and a cheesecake, JCC has all of the problems that we may face with when making a chiffon cake or a cheesecake.

The most common problems of JCC are:
- Cake does not rise or rises very little during baking. The texture of the final cake is dense and heavy, just like a cheesecake. There’s eggy smell sometimes.
- Cake starts off at a good size then shrinks during baking.
- Cake shrinks or sinks in the middle (forming a “waist”) after being taken out of oven.
- Cake collapses or deflated after being taken out of the oven
- Cake is dense at the bottom.
From my experience, the 2 main causes of these problems are:
- Cause #1: Egg whites are improperly beaten: either under- or over-beating egg whites can be a problem. Furthermore, if you fold the beaten egg whites with a wrong folding technique, their air bubbles will be deflated, which prevents the cake from rising and developing its fluffiness.
- Cause #2: Improper baking method: Insufficient baking time & incorrect baking temperature.
Possible solutions:
For cause #1: Egg whites for JCC should be beaten till almost stiff peak. As there are quite a lot of fats such as cream cheese, heavy cream or butter in the cake batter, if the egg white is not stiff enough, the air bubbles in the egg white will break very easily when we fold this beaten egg white into the mixture of the remaining ingredients (including egg yolk, flour, cream cheese, and other diary products such as milk, butter.. ). Hence, there won’t be enough air bubbles for the cake to rise properly in the oven. The texture of the cake may be dense and not fine and smooth.
However, egg white should not be too stiff because it will be very difficult to fold too stiff egg white into the mixture of the remaining ingredients. As a result, inexperienced baker will fold too much to combine the ingredients, which also leads to deflation of beaten egg white, making the cake less fluffy and light.
For JCS, I usually beat egg whites until it is foamy and white, then lower speed to medium and continue beating to the point that if you lift the beater up from the egg whites, they will form peaks but these peaks can bend over a little bit. In addition, when you scoop the egg whites using a spatula, they should have a certain level of elasticity instead of being overly stiff. The egg white also looks quite glossy and shiny.
If egg whites are beaten correctly, you will see them incorporate with egg yolk and flour batter into strings during the folding step. Once they are folded, the mixture should be unchanged in its volume and has a spongy texture developed by the egg whites’ air bubbles. If the mixture otherwise sinks in volume, is too runny and/or excessively bubbly, then it is likely to be improperly folded or have over/under beaten egg whites.
For cause #2: there are 2 things that you should be noted:
* Always bake JCC in water bath in a correct way: place the baking pan into a larger tray, add hot water into the tray at 1/3-1/2 height of the pan, then place all of them into the oven and bake for the exact time and temperature required.
Why do we need to bake JCC in a water bath? JCC contains a large amount of liquid and fat ingredients. Hence, the cake needs to be baked slowly and gradually. If there is no water bath, the high temperature in the oven will cook the surface and edge of the cake very fast, while the center of the cake is still wet due to the large proportion of fat. As a result, the cake can be over-baked on its side and surface while under-baked in the center. Moreover, steam released from boiling water keeps the surface of the cake humid enough that it won’t dry or crack, while allowing the center to be gradually cooked.
I personally tried to alter the above method, either removing the water bath, or by replacing the water tray with a smaller cup of water. Needless to say, they all failed, probably because those alternatives couldn’t maintain the humidity needed to keep the cake moist enough at its surface while slowly cooked in the middle. So I eventually went back to the traditional way, which never left me disappointed.
You might concern whether the bottom of the cake will be too wet if the baking pan is placed into the water bath. I can tell that this problem actually doesn’t lie in the baking method, but the type of baking pan you use. For pans with removable bottoms, water will leak into the pan no matter what (I tried covering the pan with double layers of baking foils and it failed). So my suggestion is using solid bottom baking pans, which will keep the cake at the most perfect quality.
* Be careful when setting baking time and baking temperature.
For the sunk-in-the-middle or forming-a-waist type of problem (collapsed, shrunken, deflated, etc.) the main reason lies in wrong baking temperature (usually too high temperature, or using too large baking pans in a too small oven) or insufficient baking time. You can refer to THIS article to solve these problems.
For JCC, you need to be extremely patient to bake it, which means do not open the oven too soon during baking, and do not take the cake out of the oven unless it is completely done. At 150-160°C/ 300 – 320°F, a 6-egg cake using 20cm round pan usually needs 70-90 minutes to bake. Compared to normal cakes, the JCC cake takes twice as long to bake, so at some point you might feel so frustrated that you take it out of the oven after only 50-60 minutes. If you do so, the cake might initially looks gorgeous: it rises and has a golden yellow color looking like it is cooked; but is in fact partly uncooked inside due to its large amount of moisture. Therefore, the moisture will later make the cake shrink, and eventually sink or form a waist. To sum up, my advice is a bit over-baking is way better than under-baking.
Personal experience: I used a 52L oven, 20cm diameter baking pan, 6 egg recipe, and baked at 155°C in 1 hour and 20 minutes. After that, I turned off the oven and opened it, while leaving the cake inside the oven for 15-20 more minutes before taking it out. If your oven is smaller, you might need to bake at lower temperature and longer time (again, my advice is avoid using large baking pans in small ovens or your cake will likely be undercooked in the center).
The last and most important advice is understanding your oven because each oven has its own troubles, so the more familiar you are with you oven, the better you know how to adjust it to proper temperature: avoid too high temperature (makes the cake sink), avoid too low temperature (makes the cake too thick in the outside while underbaked in the inside), as well as bake long enough (a bit over-baking is way better than under-baking).
So the above are the key notes for making JCC that you should keep in mind. I hope they are helpful and I wish you lots of success right at your first time trying this recipe.
My last note is about the ingredients for the cake. I did try many versions of this cheesecake and some years ago, I was very happy with a version that uses butter with milk and cream cheese. However, later I had chances to try quite many JCC in famous bakeries in Japan. Actually, I should not call it JCC because there was no cheesecake there but only Japanese cotton cheese souffle (let’s take it as JCS). Those cheese souffles taste really really nice, so soft, fluffy with a distinctive flavour that I never tasted in my homemade cakes. Then I started to “play around” with JCC again, trying different “combos” of ingredients to get the “right” taste as the cheese souffle in Japan. And finally, I came up with the recipe in this post,which gives almost the same taste as the taste of the JCS that I tried in Tokyo.
————————
JAPANESE COTTON CHEESECAKE RECIPE/ JAPANESE CHEESE SOUFFLE RECIPE
TOOLS: 15 cm in diameter round pan (For a 18 – 20 cm round pan, double the recipe)
INGREDIENTS
- 125 gram (4.4 oz) cream cheese
- 110 gram (approx 1/2 Cup minus 1 tsp) whipping cream (30-35% fat)
- 3 egg yolks (18-20 gram/yolk) – at room temperature
- 20 gram (1.5 Tbsp) caster sugar
- 50 gram (1/2 cup minus 1 Tbsp) cake flour
- 20 gram (2 Tbsp) corn starch
- 3 ml (1/2 tsp) vanilla extract (optional)
- 1 orange (or lemon) zest – finely shredded to avoid bitterness (optional)
- 3 egg whites (33-35 gram/egg white) – at room temperature
- 50 gram (1/4 cup) caster sugar
- 1/4 tsp cream of tartar (or can be substituted by lemon juice/vinegar of the equal amount)
* Note: If you don’t have cake flour, you can substitute the whole amount of flour (50g cake flour + 20g cornstarch) with 40g all-purpose flour + 30g cornstarch. Though this couldn’t be a perfect substitution, the good thing is that it will not affect the soft and spongy texture of the cake.
INSTRUCTIONS
This recipe has a video tutorial and has been uploaded on my YouTube Channel (Savoury Days Kitchen). If you can’t play the video on this site, you can watch it directly on YouTube via this link.
Note: the video is in HD setting and has English subtitle, please press CC to activate it.
Printable recipe
1. Line baking pan with parchment paper (make it easier to take the cake out of the pan). No need to grease or line the sides of the pan. Preheat the oven at 180°C/ 356°F, both upper and lower heat.
2. Boil some water in a small saucepan. Place cream cheese, whipping cream and sugar into a bowl (use a bowl that is larger than the pan so that when you place the bowl over the pan, the bottom of the bowl doesn’t touch the water). Bring the water to boil then lower the heat. Place the cream cheese bowl over the pan, whisk the ingredients together until they are dissolved and incorporated. Take the bowl out of the pan.
3. Wait until the cream cheese is partly cooled, then add in the egg yolks, vanilla extract, and orange/lemon zest (optional). Mix until incorporated.
4. Sift cake flour and cornstarch in the bowl, mix well until incorporated. Run the mixture through the sieve 1-2 more times and place it aside.
(Once this step is done, you can boil water for the water-bath step)
5. Beat egg whites with salt, cream of tartar and sugar until they reach the soft peak stage.
*Note: Bowl, whisk, and the egg whites should all be free of oil, butter, egg yolk, or any fat ingredients.
6. Place 1/3 of the egg whites into the egg yolk and cream cheese mixture, gently stir in one direction. This step will help “lighten” the egg yolk mixture, and thus prevent air bubbles from breaking in the next steps.
7. Dividing the remaining egg whites into 2 parts, mix one by one into the cream cheese bowl. Use the folding technique to fold egg whites into cream cheese and egg yolk mixture. Once you are done, if the total volume of the mixture is almost unchanged while its texture is foamy, smooth, and free of air bubbles, then you got it right.
8. Place the baking pan into a large high-sided tray and put everything into the oven. Pour hot (boiling hot for the best result) into the tray up to 1/3 – 1/2 the height of the pan (you should wear oven gloves during this step to prevent burns).
9. After pouring the hot water into the tray, quickly close the oven door. Bake at 155-160°C/ 311-320°F in about 40 – 50 minutes until the cake top is golden brown. Then lower the temperature to 140°C/ 284°F and continue baking for 20 – 30 minutes more.
If you got the proper temperature, the cake should rise very slowly (if it rises too quickly, the temperature is likely to be too high and you should set it lower next time). After 45-60 minutes, the cake’s surface will turn into a dark yellow color. You can prepare a piece of aluminum foil (poke some small holes on it to keep the cake’s surface from getting too moist). When the cake turns into a dark yellow color, quickly open the oven and place the foil above the cake. Continue baking; you can test the cake after at least 60-65 minutes. The cake is perfectly baked if it fully rises and springs back if you gently press on it with your finger.
Once the cake is baked, turn off the oven, slightly open the oven door and leave the cake inside for about 15 minutes. The cake might shrink a little bit and pull away from the sides of the pan. Now you can take it out of the pan, remove the parchment paper at the bottom and let the cake completely cool on the rack. You can prepare a mixture of honey and warm milk to brush on top of the cake.
Once the cake is taken out from the oven, it will shrink quite a bit – which is completely normal. The perfect cake should not collapse or be overly moist; it should be in good size and shape, moist inside yet spongy, soft, and free of large air bubbles.
You can now brush the honey-milk mixture onto the cake. Store the cake in the fridge and serve within 1-2 days. If the cake is baked in a small pan, you can serve it right after it is baked.
Common problems, causes and solutions:
- Cake rises too high yet sinks in the oven: Either baking temperature or upper heat is way too high; or cake is placed too close to upper heat.
- Cake doesn’t rise, or becomes too dense or chewy: improper egg beating or folding technique that deflates the air bubbles.
- Cake fully rises, yet shrinks after being taken out of the oven (mostly comes with slight smell of raw egg): insufficient baking time.
- Cracks on the surface: (possibly) lack of water in water bath, or too high upper heat. I personally don’t consider this as a big issue as many family ovens have the issue of top heat higher than bottom heat. So it’s kind of non-fixable issue. However, if you do want your cake to have a perfect surface, try lining parchment paper around the side of your cake pan and bake with only bottom heat in the first 2/3 of the baking time. Only turn on the top heat when the cake is fully risen and the color of its surface starts turning golden.


This works! Finally! I followed other recipes and baking instructions from the internet twice and failed (both cake collapse when cooled and became dense. This is my 3rd attempt and your instructions was spot on. I bake this cheesecake in a 8.4in (21cm) glass pan. The difference between your instruction and the other 2 that I tried and failed was the heating instruction and the beating of the eggs. Preheating the oven first and lowering them accordingly was the trick and making sure that I did not underbeat or overbeat the eggs. Thanks!
Omg I just made the recipe yesterday for my boyfriend`s birthday , huge succes !!! thanks for such a well explained recipe, and all the tips, it just came out great , i think i over cook it a bit, it felt a little dry to me but i put some fruits on top and it fixed it , the only question is for the amount of salt , y guessed it was just a pinch on the egg whites, thanks again definitely a keeper
Thank you for the recipe. For your information I substituted the cream with coconut cream. The cake retained its fluffiness while the coconut imparted a nice aroma and flavour to the cake.
Hello dear.
I’ve tried your recipe twice.The 1st, the meringue was stiff peak n my cake turned a bit dry.2nd, i just whipped the egg white till soft peak and the cake was good.but the problem is,both cake need 2hour n 30 minutes to completely baked.and the top of my cake didnt turn golden brown at all eventhough it was completely baked.i used small oven(new),lower rack,bottom n top coil,protected my pan with double aluminium foil n even put the cake pan in another pan before put them on another larger pan just to prevent condensation in my cake pan(it does happen before-my cake gets wet).I really love your cake..nice golden brown while mine looked pale i had to used top coil just make the top look brown enough but then it got burned on top.pity me…
How to get that nice golden brown…n why it took so long for the cake to cook?
Please help…
Hi Jenny, do you have a thermometer for your oven as from what you describe, I guess that the temperature in your oven is a bit too low…
Im sorry, i meant 18 cm glass pan
For a 18 cm pan you can use a recipe with 5 eggs. All of the other ingredients should be increased by the same ratio, i.e.: 5/3
Hi, im using a 16 cm pan, do i double the whole ingredients or just double the eggs?
Thankyou for this article
Hi, I’m looking to follow this recipe and do a 6-egg version. I understand that I can simple double the amount for each ingredient. What about the baking? Do I need any adjustment to it? Higher heat or longer bake time?
Yes you can double the recipe. Normally I use a 20 cm – round pan for a recipe with 6 eggs. However, note that the egg white should weigh around 30 – 33 gram each. If the egg white is larger than that, there’s a high chance that you will need a larger pan. With a 6-egg-recipe, baking temperature stays the same but baking time needs to be longer. Note that baking temperature and time can vary depending on your oven so please keep an eye on the cake.
I added ten minutes for each temperature (60, 40). Having doubled the recipe, the batter fit in my 10 in. springform pan perfectly. The pan has a glass bottom which makes it cook hotter than an all metal pan, probably helping to get an even bake. I did notice the top half of the cake was a little drier than the bottom, but still light, fluffy and moist. I used lime zest since the cake was to be served with a cherry, lime, ginger sauce. This was a perfect summer dessert. The cake was so light each person could eat a large slice.
I have been trying different recipes… all of which didn’t come out as nice. This recipe is the winner and it’s so easy to follow. Would I be able to double the recipe say to 12 eggs for a 30 cm pan?
Hi. My cake is jsut about to come out of the oven. You make mention to a milk and honey mixture that goes on the cake at the end. I’ve looked through your recipe and don’t see it mentioned there. Could you explain what you mean?
She mentions elsewhere it is one to one. I warm a 1/4 cup honey for 8 or 9 seconds, and then I even use the whipping cream I have left, and use 1/4 of that mixed with the warmed honey. It’s AMAZING.
Can I double the recipe for a big batch?
Yes you can. However, don’t use a pan that is too high because it’s easier for the cake in this pan to be undercooked and sink after taken out of the oven.
Hi,
I wanted to ask how high your 15cm cake pan is?
About 7 – 8 cm
Should this be chilled before serving? Normally Cheesecake is cold. Thank you! Can’t wait to give this a go!!
It’s not necessary to chill this cake before serving but it tastes better when it’s cold
Thank you for the recipe! I want to attempt it but I am wondering if I can serve with anything else.. usually cakes have frosting and/or fruit.. can I serve it with a dollop of whipped cream or fruit? or how can it be served? Thank you!
Yes you can serve it with cream, fruit of your choice. Sometimes I made jam (thin, simple jam just by simmering fruit with some sugar) of berries or apricot and they match perfectly
Instead of using whipping cream can we use combination of Milk and Butter?
you can but it won’t taste as good as when using whipping cream
I read a lot of recipe articles, but this ! This is SCIENCE !
Thank you !
Hi, I just made a JCC after years of making regular NY cheesecake. I read somewhere that we should bake it on the lowest rack with only the bottom coil at a low temp. My oven does run a little cool but it was at the right temp (oven thermometer). My cheesecake didn’t brown at the top or puff up. As a matter of fact it looks like my regular cheesecake though I can feel the bounce in it (too scared to cut it). Any advice. Should I have baked it with both coils on?
The reason why many JCC are baked on the bottom rack is that many ovens in family kitchens in Asia have problems with temperature, particularly small ovens. I know many ovens that top heat is significantly higher than bottom heat. Hence, placing the cake on the bottom rack is to prevent the cake from rising too fast and cracking. If your oven has correct temperature then you can put the cake in the middle of the oven (i.e., 1 rack lower than the middle rack).
What a well-presented and detailed recipe! I would like to know whether I could use low-fat cream cheese, instead. Thank you (^̮^)
Yes you can, I used light cream cheese sometimes and I didn’t recognize the difference in the taste.
I made this and it turned out perfect! But my cake floats in the water bath both before and after baking. lol! : D Didn’t affect the cake though. Next time will use a heavier pan ; )
Great! Thanks for sending me the feedback
Is it ok if we use milk instead of cream
It will affect the taste of the cake, I wouldn’t substitute like that
Hi Linh, I used to bake on a rectangular aluminum tray (disposable), is it ok to use such or it is too thin? If I can, then can I double or triple your ingredients? Like this size: HALF SIZE -DEEP Length: 12 3/4″, Width: 10 3/8″, Depth: 2 9/16″ Thanks in advance.
I’m afraid that it will be too thin and it will lose its fluffiness and softness, too if baked in such a large pan. You can double the recipe. However, be careful with the pan because you will need to bake it with water bath and the steam must be able to go up and fill all the space in the oven.
Hi there, instead of using cake flour can I use rice flour and cornflour instead? My son is allergic to wheat and tapioca flour and egg yolks. By the way, instead of baking in the oven, can I steam it? Pls advice. Thanks
Hi, I’m sorry but I think it won’t work with rice flour and corn flour, the cake won’t be fluffy and soft.
Hi! I noticed when I bake cakes the baking time for my oven is generally longer. So i bake til when a toothpick comes out clean. What about for JCC is it the same rule? Since i cannot follow the baking time as is
I just tried your recipe. The cake top was slightly cracked but as it cooled, it closed up. The texture is beautiful, light and fluffy. However, after I baked the cake, I left in the oven for about 15 minutes before I peeled off the grease proof paper which I lined. The heat moisture caused the side of the cake to be wrinkled and was a bit moist at the bottom. So I quickly put on the rack to air-dry the bottom. My question is , can I take the cake out immediately after is baked and peel off the greaseproof liner on the sides n base?
Hi Jackie, yes you can take it out sooner. However, in that case, I think it’s best to slightly overbake the cake. For example, if normally you bake this cake in 100 mins, then bake it for about 5 mins more, then take it out. This helps to reduce the shrinkage due to sudden change in temperature when we take the cake out of the oven.
Hi There,
Can I bake the cake without the hot bath? I find that the water makes the cake soggy at the bottom half where the water is. I like the top part of the cake where the water does not reach.
Hi Linda. Yes you can try putting a tray of freshly boiled water under the rack on which you put your cake. As far as I know this method works quite well in some ovens, particularly small ones. Good luck!
I live at high altitude (over 6200 feet ASL); how do you adjust the recipe for that?
Ho Linh, i’ve tried your JCC recipe and it turns out great, thanks for sharing this recipe. But there’s some problems i wanna fix, one is eggy smell of the cake which you said its underbaked so i will try to bake it longer, two is in my oppinion the cake is too sweet so i will reduce thw sugar, third is there’s no salt mention on the recipe but its mention on step by step phase so i will try to add salt next time. Last thing is i found the scent/aroma of the cheese is covered by egg aroma, is there any ingredient i can add to the recipe to make the cheese flavor stronger?maybe adding a cheddar or parmesan or edam cheese?what do you think?
Thanks
You can reduce the amount of sugar that is mixed with egg yolks, cream, flour, etc. Try not to reduce the sugar used to whip in egg whites because that will influence the quality of whipped egg whites.
Regarding the eggy smell, try to adjust the baking time and temperature a bit, probably higher temperature or longer baking time. You can add a bit vanilla extract or finely grated orange zest to compensate (but there should not be eggy smell in general, I’ve never experienced it before with my JCC).
I never used anything other than cream cheese for the “cheese part” in JCC, so I don’t have an answer to your last question. But personally, I think that they will ruin the cake.
Thank you for the recipe. My JCC has the eggy smell.. Wonder what’s wrong? Can u advise?
Normally, eggy smell is a sign of under-baked cakes, maybe you’ll want to keep the cake in the oven a bit longer.
Hi Linh,
The cake looks delicious. Have tried other recipes and it didn’t turn out, too dense. Will give this a go.
Can you please tell me what size cake tin you used? Also, can you use a non stick pan?
Thanks
Kaz
I used a round pan of 15 cm in diameter. It’s ok with a non stick pan although I’d prefer to use a normal (stick) pan for this cake. Good luck and I hope you’ll like this recipe
Hello dear.
I don’t have the round pan to bake this JCS. So, can I use the rectangle pan to bake with the same amount of recipe?
Yes you can use a 15 x 15 cm pan for this recipe
Hi! I’m gigi from Chile.. but i wonder is i can try it for business
I have tried twice those recipe and tho i have failed both times because it cracks a little in the top i admit that it it’s yet the best cheese soufle ever! So it stills worth to keep trying once and again until getting the perfect one!
I think i should get the perfect temperature of my oven for success!
Now my question is…
Can i bake several cheese soufles simultaneously in the same oven?
Because i want to make business with it… But i want to try more than just one at the time….
If you have a tip please i will appreciate it so much!
Of course i understand that i first need to adjust temperature and time for just one and then think about multiple baking
Hi Gigi, to me this cake is very sensitive to temperature. And our ovens are not always in perfect condition in terms of heat, so it’s not considered to be failure to me if this cake only has some cracks on top. However, if you’d like a smooth cake top, maybe you can try baking the cakes on the lowest rack of the oven and with bottom heat in the first 2/3 baking time. Also, if the egg white is whipped a bit too long (hence, too stiff), it’s also easier for the cakes to crack. These are some of my experiences, hope they help
For your question, yes, you can bake many JCC at the same time as long as they are put on the same rack. If you’d like to bake them at different racks then your oven should be the kind of “professional one”. I hope you get what I mean. In large bakeries, they have professional ovens that have 8 – 10 racks. The temperature in these ovens is quite stable so that no matter where you put the cakes (in the oven), your cakes still rise well.
I wish you a lot of success with your business. Don’t be bothered too much about the crack. I did try this JCC in some bakeries in Japan, not all of them look perfect but their taste was incredible, which was more than enough for customers to come again and again and again.
Linh, my oven doesn’t have bottom heat only top heat. Will it bake right if I put the cake on lowest rack. Just asking because if it won’t bake right on top heat, then, I have to buy oven with both top and bottom heat, anyway my oven is old.
Thank you for your reply.
In general, we need both bottom and top so I think you can try with both heat, if the caketop is too brown then it’s possible that the top heat is much higher than the bottom heat. Then, putting the cake on the lowest rack is a great way to solve. Every oven has its own problems, if we are aware of that problem and make proper adjustment, it will be fine Good luck!
Thank you for creating this comprehensive article on japanese cheesecake. I appreciated the troubleshooting advice and the explanation of what this cake should look and taste like. The taste and texture was on the money. I also appreciate the inclusion of mass measurements for the ingredients to ensure accuracy in creating this cake. I plan on making this more regularly.
Have a wonderful day.
Hi Stacey, thank you so much for your lovely comment! I’m very glad that you liked the cake. I actually plan to make one myself soon this week, too
Hi Linh, thank you so much for this recipe. I followed every step of mixing the cheesecake batter carefully. But for the actual baking, I do not have an oven. Therefore, I used a multi-function rice cooker that has a cake function. First I poured my batter into a 7 inch aluminium round pan. Then I added some water in the non-stick rice cooker pan. Lastly I gently placed my cake pan in the water and started baking. At the end of 45min, I opened the rice cooker to check if the cake is done. The top dome of the cake started deflating as soon as I opened the rice cooker. So I immediately closed the rice cooker lid and kept the cake under keep warm mode for another 15-20mins. When I finally took out the cake, the japanese cheesecake was deflated with wrinkly top and sides. Have I possibly done any mistakes? Can japanese souffle cheesecake be baked in a rice cooker? Anything I can change to make the cake turn out nicer like yours?
Hi there, I made the mistake of not checking my own size. I’ve used an 8″ pan with your recipe. Oh well. We’ll see. I saw your directions for whipping the egg whites you mentioned salt. I did not see salt in the recipe. I also got a bit confused when you added the flour to the cheese mix. I’d folded in 1/3 egg whites before reading through again and didn’t realise ‘the bowl’ meant bowl of cheese mix. I sieved the mix after that and folded the rest of the egg whites.
Anyway, it’s in the oven now and fingers crossed it’ll come out reasonably ok.
Hi Linh!
Thank you for this heaven-sent recipe and tutorial! Have you baked this in soufflé pans or molds? How and at what temperature and for how long? More power to you!!
Hi Trang, thank you for your detail recipe. Would you mind if i ask you something? Can I bake it by a glass cake pan? I just have this pan. Hope to see your reply soon. Thank you.
I’ve never baked a cake in a glass pan before. I guess the transfer of heat through glass might be weaker than through metal, and this might affect the cake to an extend that there’s not enough heat for the cake to rise properly. But I’m not sure… I think it might be fine with small pans (eg: round pans with diameter smaller than 10 cm). But with large pans, it can be risky.
Hi, I can’t wait to try your recipe!! But I would just like to ask how you made your milk and honey mixture, like the measurements for them.
Hi Kirsten, the recipe for that mixture is really flexible and depends on your taste. I often combine 1 part of honey and 1 part of milk, about 2 tsp each. Sometimes, I also make simple berry jam and it goes very well with the cake (I cook some berry with sugar and water, simmer for about 10 – 15 minutes until the sauce’s thickened).
Hi Linh, thank you so much for your generosity in sharing your hard earned baking efforts! I made this cheesecake twice and it was widely received! The general comments were that the cake is very light, fluffy, not so sweet and not so cheesy. All thumbs up for an excellent recipe! Tx again and look forward to more of your sharing.
Thank you for your feedback, I’m very glad that you liked the cake
I’ve tried making your recipe in an 8 inch pan but it does not rise like the one in your video. I’m using 3 eggs but should I be doubling the ingredients? Your pan in the video seems much smaller than 8 inch.
Hi Linda, first of all, my sincere apologies for replying you this late. I have been through a hectic time and I hardly had time for the site. Second, I’d like to thank you very much for pointing out my mistake. The recipe above is indeed for 15 cm dia. round pan, which is the one I used in the video. I had a note below the video on YouTUbe about the size of the pan, in which I stated that for a 8 inch round pan, we need to double the recipe. Really don’t understand why I made this terrible mistake in the post. I am very sorry for this and I hope you’ll see this comment, too….
It is not easy to find cream of tartar in my country where I live (Germany). Will the cake be ok with just lemon juice?
Yes you can. Btw, I’m living in Germany, too and I normally order my baking ingredients from here http://www.deleukstetaartenshop.com
Thank you for the recipes, especially all the details to bake them to perfection. I appreciate your sharing of these recipes and enjoy reading your blogs.
Thank you very much. I’m glad that you like them and I do hope to “seeing” you soon again on RnF