This Hokkaido Milk Bread isn’t a newly invented recipe. I have seen dozens of recipes for this bread in recent years. These recipes in general fall into two groups: the first group follows the regular bread-making method, while the second group applies Tangzhong method (or Water roux), which is famous for its ability to make the bread super soft and tender.
The recipe that I am sharing in this post belongs to the first group, which use traditional bread-making methods, hence, very straight-forward and easy-to-follow. Despite of the absence of Tangzhong, the texture and taste of the bread are still incredible. I introduced this recipe to my Vietnamese blog readers (in my other blog: Savoury Days) three years ago and till now, it is still among the most beloved recipes with hundreds of positive feedback from people who tried it (and fell in love with it).
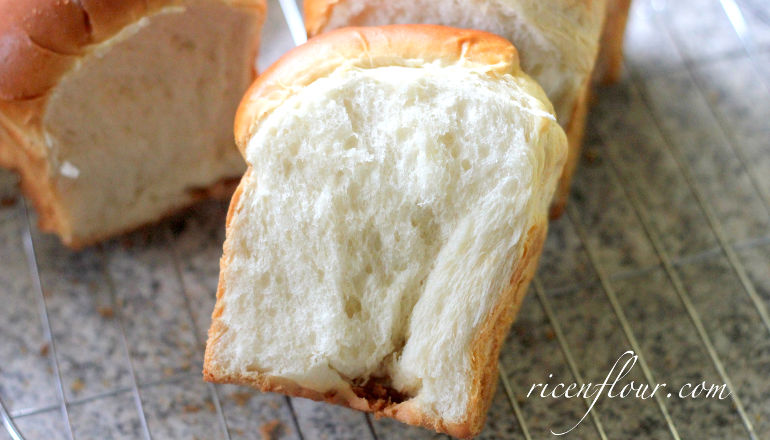
The key ingredient of this bread is whipping cream, which gives the bread the amazing milky smell with super soft, fluffy and tender texture. Hence, although in some cases, whipping cream can be substituted by butter and milk, I would not recommend doing that in this recipe.

HOKKAIDO MILK BREAD RECIPE
TOOLS: 2 loaf pans or 2 bread pans (25cm long each)
INGREDIENTS (adapted from Angie’s recipes)
- 540 gram (4 C plus 2 Tbsp) bread flour
- 60 gram (1/2 C) cake flour
- 10 gram (1 Tbsp) instant yeast
- 30 gram (3-1/2 Tbsp) dried milk powder
- 80 gram (1/2 Cup minus 1-1/2 Tbsp) caster sugar
- 1.5 teaspoon (8 gram) salt
- 1 egg medium size (50 gram, excluding shell)
- 250 ml (1 C plus 2 tsp) milk
- 150 ml (1/2 C plus 2 Tbsp) whipping cream
* Notes:
– If you don’t have bread flour and cake flour, you can substitute them entirely with all-purpose flour.
– Prepare extra 20 gram cake flour to coat (if you will be kneading dough by hands)
– If you don’t have dried milk powder, you can leave it out and use a bit more flour (10 – 15 gram/ 2 – 3 tsp). However, milk powder deepens the milky flavor of the bread quite a lot so it’s better to include it in the recipe. Don’t buy the milk powder for babies or toddlers as it’s very expensive. Normally, I buy the milk powder that is used to mix with coffee.
INSTRUCTIONS
This recipe has a video tutorial and has been uploaded on my YouTube Channel (Savoury Days Kitchen). If you can’t play the video on this site, you can watch it directly on YouTube via this link.
Note: the video is in HD setting and has English subtitle, please press CC to activate it.
* Notes:
– In the video, I only make half of the above recipe.
– The yeast used in the video is instant yeast, hence, it does not need to be activated. However, if you use dry yeast and not instant, you will need to activate it in advance. Instructions on how to activate yeast is in step (1) below.
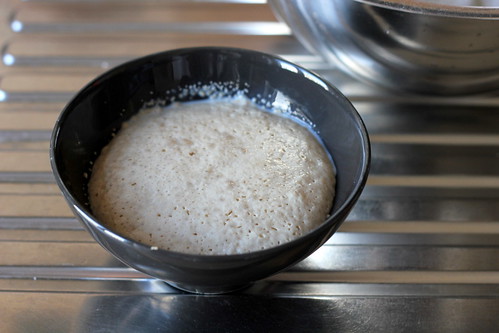
1. Warm up milk to about 35 – 40°C/ 95 – 105°F ideally (must not be any hotter than that, it could kill or deteriorate the yeast’s activeness). Add 5 gram/ 1 tsp sugar and the entire amount of yeast to the milk, stir gently. After 5-10 mins, the yeast will have absorbed the liquid to activate and begin to rise to the surface, producing a foamy layer like the picture below. If the yeast doesn’t rise then either your yeast is spoiled and unusable, or the milk is too hot and has probably killed the yeast. In either case, just discard the mixture and/or spoiled yeast and start all over again.
2. Put bread flour, cake flour, milk powder, sugar, and salt into a mixing bowl. Whisk evenly together.
3. In another bowl, combine the egg and whipping cream. Add the yeast and milk mixture, mix well together.
4. Slowly transfer the egg and milk mixture (3) into the flour bowl (2). Combine well with a spoon. After all the ingredients have come together, you should get a lumpy mixture.
5. Kneading:
A. Kneading by hands:
– Cover the dough with a damp cloth or plastic wrap and set aside for 20-30 mins. This step’s purpose is to enable the dough to absorb the moisture and build some initial gluten chains, which will mitigate the dough’s stickiness, making it easier to knead.
– Transfer the dough to a lightly floured work surface. Knead the dough until it becomes smooth and elastic, and no longer sticks to your hands (or knead with a bread-mixer for an equal amount of time). If you press your finger into the dough, it should spring back.
The Hokkaido milk bread dough is rather moist, kneading it by hands entails some patience. You can use flour to coat, but only little by little, avoid adding too much from the early step, which could dehydrate and harden the dough. After 5-10 mins of kneading, the dough should become much less sticky. Eventually, it should feel moist to the touch, but no longer stick to your hands, and can easily be handled.
In the last minutes of this kneading stage, I use the dough slamming technique. For dough with high moisture, slamming the dough against the surface is an effective method to enhance the gluten formation, increasing its resilience. For visualise instructions, see video above.
* Note: Different flours have different levels of moisture absorption. This dough is high in liquid content, but not too moist, and can absolutely be handled by hands. If your dough seems excessively sticky, then your flour may be less water-absorbent. In this case, you can add more coating flour, but try to add as little as possible, because the dough will dry up during the kneading process.
In contrast, if the dough feels dry and hard or stiff when you knead it, add 1 – 2 tsp milk and continue kneading until it’s softer and more flexible. Note that higher hydration is better for bread dough as water helps bread rise better and gives softer, moister texture.
B. Kneading with bread mixer:
Transfer the whole mixture into the mixing bowl, start at low speed then gradually raise speed to medium. Mix for 12-15 mins until the dough becomes smooth and elastic. If dented by your finger, the dough should spring back. Be careful not to overmix, since the gluten structure might be dwindled.
6. Primary fermentation: Use a big bowl, grease the inside with a thin layer of oil. Turn over the dough inside the bowl so that the oil evenly covers the entire dough surface. Cover the bowl with a damp cloth or plastic wrap. Let proof at room temperature (25-32°C/ 77-90°F) until the dough has doubled in size.
* Note: There’s no fixed fermentation time, because the dough’s rising pace depends on the ambient temperature. “Until the dough has doubled in size” is the most accurate benchmark. You can also test the dough by poking it with 2 fingers, about 1-2 cm deep. If the dough stably holds the indent, then the dough is properly fermented. If the indent starts to fill back in, you need to let it proof for a bit longer.
7. Shaping: After the dough has doubled in size, gently press the heel of your palm into the dough to force some gas out of it. Transfer the dough to worktop, quickly knead for 1-2 mins.
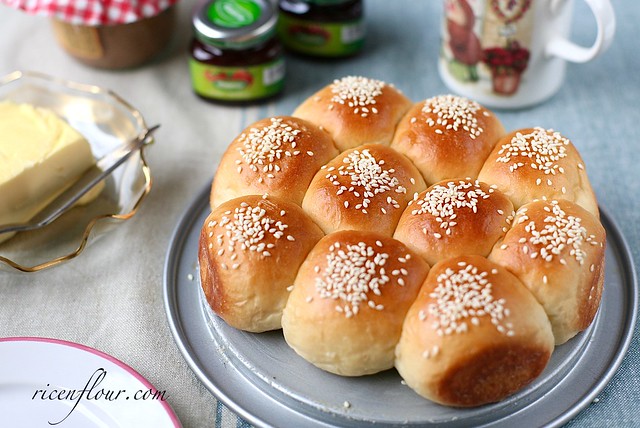
At this point, depending on your preferences and what you’re after, you can shape your bread into a large sandwich loaf; or divide the dough into smaller pieces (scale to make sure they’re equal) and roll them up into bread rolls.
I’ll hereby be giving you instructions on how to shape a loaf of smaller rolls. I used ½ of the ingredients amount, which perfectly fit a 25 cm loaf pan. After the first fermentation and brief kneading, I rescaled the dough and divided it evenly into 4 small pieces (approximately 140 gr each).
At this step, the dough is very smooth and not sticky at all (if it still feels sticky, you can add some more coating flour). Roll each peace out into thin rectangles. When rolling, the dough may slightly spring back, which is a normal phenomenon. The best way to deal with this is rolling out all 4 pieces, then letting them rest for 2-3 mins so the stretched gluten strings can “rest”. Then come back to the first piece, roll them again before shaping, the dough should be less springy by now.
Here’s how to shape each dough roll: Roll the dough along the longer edge (or fold each 1/3 or ¼ of the dough over one another). We will get a “fat roll” then.
With a roller, flatten each of these fat rolls and roll them up again to get the final roll.
After you’ve finished shaping all the rolls, line them up inside the loaf pan. If your pan isn’t non-stick, grease the inside with either melted butter or oil so the bread won’t stick into the pan
8. Final fermentation: Let the shaped breads proof in a warm and humid place, until they have doubled in size. I placed mine in the oven by preheating it at 50°C/ 122°F for about 3 mins, then turned it off. Place a glass of boiled water inside the oven to assure sufficient humidity, preventing bread surface to dry up. Ideal temperature should stay between 33 – 38°C/ 91 – 100°F, it must not be any hotter, which could weaken or deteriorate the yeast’s activeness.
Preheat oven before baking for about 15 mins, at 170°C/ 338°F (top and bottom heat). Since preheating takes some time, you can start preheating when the breads have risen by 70-80%. When the oven reaches its needed temperature, your breads will have finished proofing as well. (Don’t forget to take the breads out before turning on the oven if you’re letting them proof in there.)
9. Bake at 170 – 175°C/ 338 – 350°F for approximately 30 – 40 mins until the top is dark golden brown. If the bread turns dark too quickly, cover the top with a piece of aluminum foil to avoid the bread getting burned. Don’t overbake the bread because it’ll make the bread dry with thick crust.
10. Once the bread is done, take it out of the pan. For the final glow and delicious aroma of the bread, you can brush the top of the bread with some melted butter or whipping cream. Brush little by little so the butter or cream has time to be evenly absorbed.
This bread can be eaten warm, but if you wish to slice it like how you do a sandwich loaf, then you have to wait for it to completely cool, otherwise the inside of the bread can get sticky to the cut.
Store in completely sealed box/bag, in a cool place. Good to eat for about 1-2 days.
Hokkaido milky buns – my favourite for breakfast (and dinner, also  )
)
—————
RELATED BLOG POSTS: HOW TO MAKE BREAD (101 TUTORIAL)
- Part 1: Preparing ingredients
- Part 2: “Starters” and How to knead bread dough
- Part 3: Proofing and Shaping bread dough
- Part 4: Baking and Storing bread


Hello, would it be okay if I used your recipe and sold this bread for my business? Thank you!
Sure, if possible, please recommend your friends and customers to my site if they want some guidances to try making the bread at home
Good luck with your business!
Thank you so much!! I’ll definitely recommend your website possible, thank you for the encouragement as well ♡
I tried making this. The first time, I thought the dough looked dry compared to your video, so while I let it rest for the first 20 min, I made a second batch. Both versions came out great! I think I may try to use a dough hook next time because I had to knead the dough for 30 min and even then, the window pane test didn’t come out 100%. The bread was delicious out of the oven and the next day. Even 3 days later, the bread is still soft – not as soft as freshly baked, but it hasn’t dried out. I pop it in the toaster oven for a minute or two and it is SO GOOD. Thank you for sharing your recipe and the video. The combination really helped make this a success!
Thank you very much for your feedback I’m glad that your bread came out great!
Some types of flour can absorb more water (even if they are the all bread flour). So, feel free to add more milk if you feel your dough is dryer than mine. Dough with enough liquid is always easier to be kneaded and also creates softer bread.
Thank you for the great video.
I’ll try this recipe as soon as possible, the bread looks fantastic.
I am so inspired by reading from the top till the latest comment. I am thankful of your kindness. You are a wonderful Coach, Advisor, Trainer, and great Baker. Your kindness of sharing your know-how and experiences without any expectation in return are such a Beautiful soul.
Thank you
Thanks for the lovely recipe! It’s my very first successful bread! Soft and fluffy! Yummy… I just made it using it as the bread Base with coconut fillings! Hope it turns out yummy too! Wanted to ask you if I can use this as a bread Base for all kinds of fillings? Like cream cheese, or cinnamon swirl or red bean paste etc…. ?
Hi, i’m looking forward to making this bread. I was curious, is it possible to knead this in the kitchen aid mixer? If so, what speed and how long? Thanks for such a thorough tutorial
Yes you can use a standmixer, just pay attention to the kneading time to prevent over-kneading the dough. I’ve never used a standmixer for this dough but when I used my hand mixer with 500 Watt, it took me about 12 – 15 minutes to get the dough ready on 2/5 speed.
I’ve been using my stand mixer on this recipe. It’s super easy! I use the petal attachment at medium speed to mix the ingredients initially. Then switch to the dough hook on high and kneed for a about 10 minutes. I would check midway to see how the dough coming together. I stop once the dough becomes elastic and that I can see it can really stretched out like shown in Linh’s video. My kids and myself really enjoy this bread. My son now would only eat this bread and not those from the store. Thanks for the recipe Linh!
Awesome bread! I baked this last night and my family totally loves it. I used lesser yeast and proofed it longer and it’s amazing. Thanks for sharing.
Greetings. Thanks for sharing this recipe. Your video is a great tutorial. I have a question, I live in Venezuela,and this moment, we´re having difficulties buying things. It´s very hard to find whipping cream, if there is any. What can I use instead? Just milk? Congratulations again.
Hi Dulce, I wish I could help you but cream is the key of this recipe so I’m afraid we cannot substitute it with anything. Although sometimes it’s suggested that butter and milk can be used to replace whipping cream but in this recipe, it will change both the texture and taste of the bread if we do so.
I have some other recipes which also make very soft and fluffy bread and use only butter and milk, if you’d like to take a look, here is an example https://youtu.be/VOFxfz1lsPc
You will find the links to more bread recipes tutorial in the caption below the video.
Hello! I saw the video and it’s really precise and very clear. I made Hokkaido bread before (using the original Angie’s recipe with TangZhong) and it was very sticky and took a long time to knead. It came out fine in the end. But I’m looking forward to making your version without the TangZhong. You are highly recommended by Rose Levy Berenbaum, who is also a very respected baker and cookbook author. Thank you for sharing this with everyone!
Hi Esther, thank you very much for passing by. Yes, it was indeed my honor that my recipe could be tested by Rose. She also made some adjustments with the recipe and updated on her blog so if you’d like to try this recipe, maybe you want to check her post, too. Good luck and I hope you will like the bread
i have just done a posting with a link to your wonderful video and blog. i tested the bread 7 different times and published the results with photos. i hope you will enjoy reading it at http://www.realbakingwithrose.com
i’m also curious to know if your cake flour is bleached.
thank you for making it possible, after 30 years of longing for this bread, to make it so successfully.
Thank you for sharing this recipe. It is the best recipe and easy. I love how my breads turns out.
Greetings 🌹 Happy 2017.
Thank you for sharing with us. I m new in the world bread making 😆.
I have been baking and eating my own bread since i tried my hands on it.
I will and in fact after writing to you. I m gonna to start to bake. Fingers crossed 😃
Hi, i live in Australia . what type and brand of bread flour/cake flour did you use please? i asked because we have different types of bread flour here and i’m afraid if i use a different one it won’t turn out as good as yours.
we have flours like “”white loaf flour”, “bread/pizza flour”… we don’t have the flours with numbers in their brand name..
so i’m not sure what to use
Hi, can this recipe used to make fried mantou?
thanks
You mean steamed buns? You can check this video as the dough is specifically made for steamed buns: https://youtu.be/Kn08wqEswNg
Is it advisable for me to use the cup measurements you’ve provided? I’m from the US. Thank you!
If you have a scale, I’d suggest you to use that. I always use a scale for my recipes. I provide measurement in cup/tbsp because I know in the US people are more familiar with this. However, as far as I’m concerned, one cup of all purpose flour in Germany where I live is different from one cup of AP flour in the US. This difference can go up to 10 gram, which I consider to be quite big….
Instead of using my hands to knead the dough and let it rise, can I put all the ingredients in a bread machine and let it mix and bake by itself? Will the outcome be the same as doing it by hand and baking it in the oven?
You can use the dough function to make the dough. However, it’d be risky to use the whole procedure. I tried this recipe with my bread machine and I didn’t work.
Hi Linh, I made this bread today. At first I measured using cup but it was so dry and hard that I had to throw away and measured again using the scale. But the dough was very sticky I had to use the mixer to knead. Not sure if my scale was wrong but in the end the result was amazing. I had a lovely, milky, yummy and fluffy bread. Thank you for sharing your recipe. Will make it again and will add in chocolate chips and maybe dried cranberry as my children don’t really like plain bread.
Hi Azu, thank you for your feedback! I’m so sorry about your first dough. This kind of failure is actually not rare with bread. I heard from my readers who live in the US that they always need to add a bit more water so that their dough is not dry. While some other readers from Vietnam claim that their dough is quite wet although they scale everything carefully. Anyway, I’m happy that your bread turned out great in the end. This is also one of my most favourite recipes of all time
Hallo Linh,
What kind of flour do you use in germany for this bread?
Thank you
Hi, for the bread flour I use 630 or 550 (with about 12% protein) and for the pastry/ cake flour I use 405 (with about 8 – 9% protein). But there were times that I used just 550 and the bread was still great. Hope this helps
Linh Trang dear, would it be advisable if I wish to have more fiber in my bread to substitute 25-30% of the white flours with a whole grain flour such as whole wheat, white wheat or Spelt?
I’ve never used whole wheat flour in this recipe so I’m not very sure, but I think it’ll be fine. The dough might be drier as whole wheat flour in general needs more liquid than white flour, so keep an eye on your dough and adjust the amount of milk in the recipe accordingly.
Can i omit cake flour and use bread flour instead?
Bread flour in general requires more liquid than cake flour due to higher protein percentage. Hence if you’d like to use all bread flour, you may need to adjust the amount of milk in the recipe (or else the dough might be too dry, resulting in a dense and hard bread)
Hi Linh Trang, thank you for your answer, I’ll follow your suggestion for sure. Very kind of you.
Hi , I made half the recipe for 1 loaf with AP flour and 1 entire egg (by mistake) but all work great. What a beautiful bread so tasty and flavorful . I followed the recipe but did some S&F instead of kneading , 1 each 5 minutes for the first 15 minutes. It is ok for me and the gluten develop well . I wander if I can make matcha rolls with that . Thnks a lot and regards.
I actually plan to make a matcha flavoured Hokkaido loaf soon, too I think if you’d like to make matcha Hokkaido, it’s best to first mix some matcha powder with hot water to help the powder dissolve completely and turn into something like “matcha paste”. Then you can mix this paste together with all other ingredients in the recipe (the amount of milk might need to be reduced a bit to compensate for the amount of water in the matcha paste).
I think this way will be safer than mixing matcha powder directly with flour because from my experience, it’s sometimes really hard to get matcha powder dissolve completely in the batter (and the consequence is that we have small green dots in our cakes/breads).
The quantity of matcha powder will depend on the quality of your matcha powder and how strong of the matcha taste you’d prefer the bread to have. So I can’t tell it exactly. I think you can start with about 1.5 – 2 tsp matcha powder (3 – 4 gr) for half of the recipe, mix it with 15 – 20 ml hot water to form matcha paste. Then add this paste gradually into the dough. This way you can control the matcha taste in the bread. Good luck!!
I thought Hokkaido bread started off with tong zhong.
Many Hokkaido bread recipes apply Tangzhong technique to make the bread more pillowy and light. However, traditional Hokkaido bread recipe does not include tang-zhong and it’s also not necessary as the bread itself already tastes great.
Thank you Linh. The look and texture of your bread reminds me of our pork bbq bao’s that we buy here at our local bakery. I’ve watched them making the bread from afar and from what I’ve gathered the cooks used spray bottles to gently coat the top of the risen bread instead of brushing it. I’ll give this recipe a try.
Good luck with Hokkaido bread I think I’ll go and make pork bbq bao soon
I’m drooling… I hope you post the recipe.
I have tried this recipe, the result is as your picture shown, but not as soft fluffy as my expectation.
My question is, I wonder if it’s because there is no butter in the recipe ? Isn’t butter making it more fragrant and fluffier ? Please correct me if I am wrong. Thank you.
It’s true that butter makes bread soft. However in this recipe, we use a lot of whipping cream and since there is a high percentage in whipping cream, it makes the bread soft.
What do you think still need to be improved in your bread? I mean does it feel dry or too dense…? Maybe I can help, particularly if you have some photos of the bread,