Most of us probably have tasted and love the famous Cinnabon. Would a homemade version of Cinnabon / Cinnamon rolls sound even more appealing to you? We are still in the midst of winter and what’s better than a kitchen that is filled with the sweet aroma of freshly baked bread and cinnamon? Every once in a while, especially when it’s snowing heavily outside, all I want to have is a piece of cozy, gooey, irresistibly delicious cinnamon rolls, a cup of Earl Grey, and a cat! Honestly, cinnamon roll is just one of those classic winter treats that you can never get tired of no matter how old you are.
If you do a search on Mr. Google, countless pages of cinnamon roll recipes will pop up but I just can’t resist the urge to share this recipe of mine with you guys. The use of buttermilk gives the buns an extra degree of softness, the cream cheese glaze that is not just on top but slowly melt into in the rolls, and not to forget the rolls themselves, fluffy, airy, and bursting with buttery cinnamon. Try it and you will like it. If you already have your favourite recipe of cinnamon rolls, try it anyway, it may be another recipe to go into your favourite list 
CINNABON / CINNAMON ROLLS RECIPE
Tool: 1 round pan of 20cm-diameter or other shapes with similar dimension
INGREDIENTS
A. Bread Dough
- 260 gram (2 cups) bread flour
- 2 gram (1.5 tsp) instant dry yeast (see Different types of yeast here)
- 110 ml (1/2 cup less 2 tsp) milk
- 5 ml (1 tsp) lemon juice
- 42 gram (3 tbsp) unsalted butter
- 25 gram (1.5 tbsp) sugar
- 2 gram (1/2 tsp) salt
- 1 large egg (60 gram including shell)
- 3 ml (1/2 tsp) vanilla extract (optional)
B. Cinnamon Sugar
- 50 gram (3.5 tbsp) unsalted butter
- 50 gram (1/4 cup) brown sugar
- 2 gram (1/2 tsp) cinnamon powder
C. Cream Cheese Glaze (optional)
- 80 gram (3 oz) cream cheese – let soft at room temperature
- 20 gram (3 tbsp) icing / powdered sugar
- 60 ml (1/4 cup) whipping cream
*Notes:
– You can use AP (all-purporse) flour to replace bread flour but you may need to increase the amount used as AP flour usually doesn’t absorb as much liquid as bread flour does. Do NOT use flour that has protein content lower than 10% (eg. Cake flour); otherwise the dough will be too mushy.
– Butter can be substituted with margarine but the taste will be much less flavorful.
– If you prefer a less sweet version, lower the amount of sugar used in part (B) or obmit the sugar in part (C).
INSTRUCTIONS
A detailed recipe with all the specific notes is available on Savoury Days’ YouTube Channel (subscribe to get all the newly uploaded recipes) in both English and Vietnamese (select your preferred language by clicking CC > Setting > Language). You guys can check it out at this link or the video right below.
PRINTABLE RECIPE
1. Combine 80 ml milk with 5 ml lemon juice and let sit for 10 minutes. The milk will become acidic and form curdle.
2. Combine flour and yeast, mix well and leave aside.
3. In another bowl, add in the remaining 30 ml milk and butter. Cook the mixture using double-boiling method, stir until butter has completely dissolved. Add in sugar and salt, mix well to combine. Add in egg, mix well to combine.
4. Add the curdled milk into this mixture and mix. Add in vanilla extract if preferred.
5. Now, sift in half of the flour/yeast mixture from step (2), stir until everything becomes incorporated. Sift in the remaining half and again, stir until it forms a homogeneous mixture.
6. Transfer the dough onto the working surface that has been dusted with flour. Gently knead for about 5 – 7 minutes until the dough becomes smooth. It is not necessary to knead to the “windowpane” point (stretching a piece of dough out until you see a translucent layer that is not breaking). Refer to the video for kneading technique. During the last minute, give it a few throws for a smoother surface (refer to video for technique).
*Notes:
– Different brands/types of flour have different water absorption capacity; thus your dough may be drier or wetter than mine as shown in the video. In general, you need a dough that is elastic, easy to knead, easy to stretch, and does not stick to the hands. Adjust the amount of flour used depending on the condition of your dough.
– If you are going to use a mixer, knead at low speed for an appropriate amount of time to prevent the dough from being over-kneaded, which will destroy the gluten matrix.
7. Brush the bottom and side of a bowl with a thin layer of cooking oil, place the dough inside and turn it around a few times so that the oil sticks onto the dough (this helps prevent the dough from getting dry during proofing). Cover the bowl with a damp towel, proof at room temperature until the dough has doubled in size (proofing time varies from 40 to 70 minutes depending on the temperature; high temperature will speed up the process).
8. In the meantime, melt 50 gram butter in part (B) and combine with sugar and cinnamon.
9. When the proofing is finished, slightly deflate the dough and gently knead to get all the air trapped in the dough out. Place it on a working surface that has been dusted with flour and roll it into a small rectangle. Cover the dough with a damp towel or plastic wrap, let sit for 3 – 5 minutes (in order for the gluten strands to “relax”; thus make it easier to roll it out).
10. Brush a thin layer of butter onto the inside of the pan, then sprinkle a little bit of flour, swirl the pan around to spread the flour evenly.
11. Dust the working surface with a generous amount of flour. Gently roll the dough into a 20 x 30 cm (8 x 12 in) rectangle. Push the rolling pin away rather than pushing it down. It is best to use a lot of flour for dusting so that the dough won’t be sticking onto the surface during rolling.
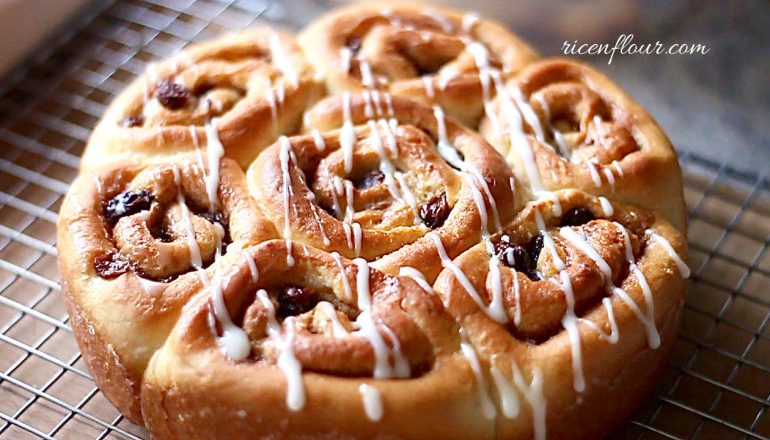
12. Brush the rectangular dough with melted butter. Sprinkle cinnamon-sugar evenly on top, leave out about 1.5 cm along the side of the upper length of the dough. Add raisins or other dried fruits if preferred.
13. Slowly roll the dough along its length, bottom up (not from the 1.5 cm plain side as seen in video).
14. Using a sharp knife, cut out 2 small pieces from the sides of the rolled dough. Measure the dough into 7 equal parts. Again, using a sharp knife, cut them into pieces in a back-and-forth manner rather than one straight cut down the dough.
15. Place the pieces inside the pan. Make use of the 2 small dough pieces that were cut out before by wrap them onto one of the 7 pieces. This big piece will be placed in the centre of the pan.
16. Cover the pan with a damp towel, proof at room temperature. When the dough has risen to 80%, preheat the oven at 180˚C / 355˚F in 10 – 15 minutes.
17. Bake in the middle rack (if the top heat is very high, place the pan in one of the lower racks to prevent the surface from being burnt). Spray a little bit of flour into the oven and at the space above the pan. Bake at 180˚C in 20 – 22 minutes, do not bake for too long to prevent the bread from drying out.
18. In the meantime, prepare the cream cheese glaze:
- In a bowl, put in cream cheese and sifted icing sugar. Using a balloon whisk, whisk until cream cheese is soft and smooth.
- Add in whipping cream and continuing whisking until blended.
- If you want to glaze to be less thick, use a little bit of milk to thin it out.
19. When the bread is done, let it cool for about 3 minutes, then pour the glaze on top. The glaze will slowly be absorbed into the bread. Best served fresh and warm. For storage, place in an airtight container, outside or in the fridge. Microwave before used (cover the rolls in the microwave to prevent drying). They stay soft for up to 3 days.
Enjoy!
- Recipe by: Linh Trang
- Written by: San Luong


JOIN US